


Maybe you’ve heard or read somewhere about Nginx FastCGI Cache and how it can drastically increase your WordPress performance. It’s true!
By reducing the load on PHP-FPM and the database, it can reduce server response times drastically, as Nginx will basically have to serve static HTML files. And Nginx is fast at serving static files!
If you’ve followed my guide from zero to cloud WordPress, in which I used a LEMP stack with Nginx configured to pass PHP requests to PHP-FPM, this tutorial will speed up your installation a lot! And it will work with other installations of course.
note: disable WP Super Cache if you used my guide. It will no longer be needed after you finish this guide.
How does FastCGI Cache work and help improve my server’s response times?
It’s quite amazing actually. Here’s the simple explanation of what’s happening when someone is visiting a page on your WordPress site or blog:
1.The browser sends HTTP requests to Nginx, and Nginx tries to fetch the page from the file system.
2.If Nginx found PHP code, it passes the request to PHP-FPM, to process the PHP code.
3.If necessary, PHP-FPM will query your database to get what it needs. If you run WordPress, it is necessary.
4.PHP-FPM generates a static HTML page, which is then given back to Nginx.
5.Nginx sends the static HTML page to the web browser.
However, this is what happens when that page is visited again and FastCGI Cache is set up. By that visitor or someone else: Nginx just serves the complete static HTML page from step 5. No more PHP-FPM, no more database query-ing. Nice and fast.
And for a while, based on your settings and server, that page will not hit your PHP-FPM or database, meaning reduced response times and increased visitor capacity for you.
Setting up FastCGI Cache
Let’s get straight to it.
You need to edit your website’s .conf file. If you’ve followed my guide linked above, it’s something like this:
nano /etc/nginx/sites-available/yourdomain.confAnd at the top of that file, add these four lines:
fastcgi_cache_path /etc/nginx/cache levels=1:2 keys_zone=mydomain:200m max_size=10g inactive=4h use_temp_path=off;
fastcgi_cache_key "$scheme$request_method$host$request_uri";
fastcgi_ignore_headers Cache-Control Expires Set-Cookie;
The first line explains the location of the cache on the disk (you can also put these files in RAM, but I wouldn’t bother for now), the levels (directory hierarchy. We’re setting up two-levels), the keys zone and it’s size. The max_size refers to how much disk space can this feature eat – if not specified it can eat as much as it wants (all of it). The inactive settings is how soon can Nginx delete a page from the cache if it received no hits. The use_temp_path is recommended to be set to off. It means that Nginx should write the cached files directly to where they will be cached. This avoid unnecesary copying of data between file systems.
Now, in the same file, above the php location block (looks something like location ~ \.php${), we need to explain what we don’t want to be cached. Because you don’t want to cache POST requests (like form sending), admin pages and stuff like that.
set $skip_cache 0;

if ($request_method = POST) {
    set $skip_cache 1;
}
if ($query_string != "") {
    set $skip_cache 1;
}

if ($request_uri ~* "/wp-admin/|/xmlrpc.php|wp-.*.php|^/feed/*|/tag/.*/feed/*|index.php|/.*sitemap.*\.(xml|xsl)") {
    set $skip_cache 1;
}

if ($http_cookie ~* "comment_author|wordpress_[a-f0-9]+|wp-postpass|wordpress_no_cache|wordpress_logged_in") {
    set $skip_cache 1;
}
This just lets us have no cache when we don’t want one. Easy.
Now, inside the PHP location block, location ~ .php$, we need to add the following:
fastcgi_cache mydomain;
fastcgi_cache_valid 200 301 302 4h;
fastcgi_cache_use_stale error timeout updating invalid_header http_500 http_503;
fastcgi_cache_min_uses 1;
add_header X-FastCGI-Cache $upstream_cache_status;
fastcgi_cache_bypass $skip_cache;
fastcgi_no_cache $skip_cache;
We’re basically stating the fastcgi_cache that needs to be the same as what we wrote in the fastcgi_cache_path. And then that 200, 301, 302 requests should be cached for 4h.
Another interesting line, and an amazing feature of the FastCGI Cache is the third one. Use Stale basically refers to the fact that we can serve the live page in case the database or PHP-FPM has died. So visitors will be server the cached page instead of an error if your database died for example. Amazing! This is something that no caching plugin can do.
Do note we’ve added a new header: X-FastCGI-Cache. This can have 3 values: HIT, MISS or BYPASS. HIT means the page is cached. MISS means that the page was not cached and BYPASS means that it was intended for this page to not hit the cache and bypass it.
Now just restart Nginx and everything should be ok. You can test first with nginx -t if you want to.
Let’s test if this works
After applying the above directives and restarting Nginx, we should visit a front end page while we’re not logged in as an admin in Google Chrome.
If you press F12 to open Chrome DevTools, and go to the Network tab, then the Doc filter, you can see at the Waterfall column, the TTFB. It’s the green portion! Hover over it to get the actual value. Like so:
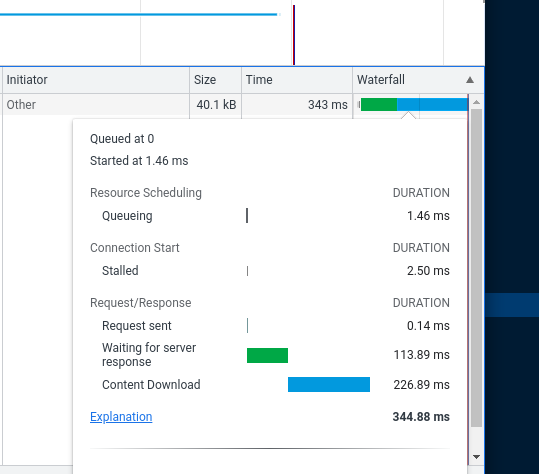
As you can see we have a TTFB of about 113ms. This server had about 115ms with WP Super Cache and 151ms+ without any caching. The gap is just two miliseconds. But in my experience the gap widens as the WordPress install is more complex. This is a GeneratePress theme, with minimal stuff.
How do you clear or empty the FastCGI Cache?
You empty the FastCGI cache by deleting the files and directories inside /etc/nginx/cache. Or your cache’s path as per your .conf file.
So by running this command:
rm -Rf /etc/nginx/cache/*Done!
Some ramblings about WordPress and FastCGI Cache
Now, it really depends on how comfortable you are, what type of website you run and your expectations.
I often don’t ever bother setting up a WordPress plugin for FastCGI Cache. As I rarely update stuff and want the updates to be visible ASAP. And I can see it ASAP because the FastCGI cache, as set up in this guide, does not serve cached pages for logged in admin users. So I can check if everything is ok. It’s only the visitors who don’t see the update as fast as I do.
And the caches pages eventually expire, because that’s how it’s set up… the update will eventually show. So yeah… I’m lazy.
But if it’s something really important I just manually clear the cache by deleting the cache folder contents like described in the steps above. As I’m not bothered by quickly SSH-ing into the machine and run one command which I know by heart after so many years.
In the end, it’s your call.
Useful WordPress plugin nr.1: Cache Sniper for Nginx
The Cache Sniper for Nginx plugin still works!
You need to set up some things after installing it: the cache path is /etc/nginx/cache as per this guide and the cache levels are 1:2. That’s it!
It can:
- Clear cache of page on content update
- Clear cache of page on comment
- Clear home page on content update (so new posts appear on homepage instantly)
- Clear homepage on comment.
The main advantage of this plugin is that it does not require anything. It already works with your installation!
Userful WordPress plugin nr.2: Nginx Helper
Nginx Helper, is another great plugin to help you manage the FastCGI Cache.
It comes with one caveat: it needs a third party Nginx module, that this guide does not cover. I will make a guide in the future and link it here. Basically you need to reinstall Nginx with the fastcgi_cache_purge module.
Nginx Helper is more tested and as far as I know friendlier with multi-site installations. It also has a few more settings for when to clear the cache.
And that’s about it! You now use FastCGI Cache!
I hope you found this guide useful and that you’ve sucessfully improved your WordPress installation.
You might be left with one question: but how do we speed up dynamic pages? Like pages that cannot be fully cached. Like my account pages, the dashboard and other stuf. You could use Redis Object Cache to reduce the MySQL/MariaDB database load and make these type of pages faster. But some pages, you never want to fully cache. That’s why you fully optimize your server/setup/stack/application and not just apply a bandaid like a cache solution.


