


Welcome to the guide that’s gonna help you get from knowing absolutely nothing about this subject to you owning and having your own WordPress website or blog, ready to pour content into it.
The essential parts are numbered in the below table of contents. But I strongly recommend you go over all the article in order to understand the reasoning behind doing something like this.
- Why this guide was made
- What this guide will cover
- This guide vs shared hosting
- 0. Costs and requirements
- 1. Buying the domain name
- 2. Buying & configuring the cloud server
- 3. Installing the LEMP stack
- 4. Configuring the LEMP stack
- 5. Installing WordPress
- 7. Securing everything
- 7. Finishing WordPress configuration
- 8. Stack optimizations
- 9. Final optimizations & ideas
- 10. What’s next? Maintenance?
- So how fast is this thing?
- What to work on next?
- All done
Why this guide was made
I feel that it could be a great starting point for anyone who wants to DIY his or her own website or blog on a budget while learning something new.
And learning by doing is much easier, in my opinion.
Another reason is that I couldn’t easily find a guide on everything needed to go from ‘i have no clue where to start’ to ‘I own my own domain, server, and installation’.
I feel that a long article, with everything you need to actually start in one place, was needed on this blog (even if it might not be the greatest idea from a SEO perspective :)) ).
This should be the article that takes you from complete beginner to having a cloud server configured by you, running with WordPress.
And then some! Visit the additional links (that are basically other articles on this blog) to improve and optimize your WordPress installation even further.
Disclaimer: this article might contain affiliate links. They do not cost you anything, but following them can give me a bonus – and you too sometimes, like Hetzner cloud credits. It’s one of the ways bloggers make a couple of bucks. Just a heads up.
What this guide will cover
Everything. From buying a domain to choosing a server to actually getting your hands dirty in your Linux installation to get your WordPress up and running. I am assuming you know nothing and want to learn.
If the Linux part got you scared, chill. It’s not that hard! Just follow along.
A video version of this guide will come soon on my YouTube channel. I figured it’s easier to follow something written, with images, on your own time.
Some parts of this guide will link to articles on this blog if you want to go deeper than this guide. It is not mandatory to follow and read them, but they might help you get better results and a better understanding on why you are doing parts of the guide and how it works.
This guide vs shared hosting
I’m going to quickly outline the major differences between having something done this way (like in this guide), and simply installing a WordPress instance on some shared hosting plan.
Disclaimer: I am not bashing shared hosting providers. There are some reliable serivces out there, and very easy to get a blog or website going. But I am saying that if you’re willing to learn, you can get more for your money. And you won’t waste that much time maintaining stuff while learning something useful in the process. Or just for fun. I know I’m having fun doing this 🙂
Disclaimer 2: Any outside links to other websites or companies are either affiliate links, or just links. This is not a sponsored article, and nobody is sponsoring me. I would mention that if it were the case.
| Wordpress in this guide | WordPress on Shared Hosting |
| Faster | Your mileage might vary. Depending on server neighbours and your plan, it might be much slower. Sometimes, even with caching. |
| You’ll learn something | Click, click, done! |
| Cheaper to maintain | Usually a fixed monthly fee |
| Costs time to get running | Less time-consuming upfront |
| Fun | Not so fun |
Note: in the other corner, we have managed WordPress hosting offers. They are usually quite expensive but really good and highly optimized. And usually less headaches than even shared hosting.
0. Costs and requirements
A list of what you need in order to successfully finish this guide/tutorial:
- some spare time;
- obviously, your PC or laptop (the Operating System is irrelevant);
- an SSH client or just the terminal if you’re on Linux;
- buy a domain name (what is a domain name?), I’m using Namecheap in this guide (about 8.73 euro per year for a .com domain, initial registration might be cheaper if you catch a promo);
- buy a server, I’m using a Hetzner Cloud plan in this guide (from 4.15 euro per month, vat included);
- get some e-mail for your domain. I advise against hosting your own e-mail server. I use Namecheap here too (1 mailbox with 5GB for 14.44 euros or $14.88);
And that’s about it.
Of course, you can skip e-mail completely and just use something like Gmail. But an e-mail with your domain like contact@yourdomain.com looks more professional.
And you can use other cloud services providers too. I went for a budget option. But there are providers like Digital Ocean, Vultr or Linode that are a bit more costly. I won’t cover AWS services and the like, as I will try to keep things as simple as possible.
But to validate an idea, you can safely host your project for the first months on something cheap. Or to learn. You don’t need to splurge a lot of $$ for learning.
So how much would it cost per month?
I’m obviously not factorin in time. But time investment should be minimal towards managing the actual server/installation, as your server will be quite secure.
If we take a 13.76 euro renewal fee for your .com domain and divide it by 12 months and 4.15 euro per month we would get about 5.29 euro ($5.45) per month. That’s $5.45 for a WordPress website or blog that can handle a lot of traffic. A LOT OF TRAFFIC. And if we factor in Namecheap e-mail too, we’d get about 6.49 euros per month or $6.69.
So, total costs per month:
- $5.45 without e-mail;
- $6.69 with e-mail;
And if you hunt some promos or pay in advance for several years, you can even get better prices. For example, I caught a promotion for just $10.88/year for e-mail instead of $14.88. And I once had one e-mail for <$5 for the first year. So it’s worth ‘hunting’ a bit.
You’d have a hard time finding a shared hosting provider that would consistently outperform your DIY server.
As a reference, one of my blogs is set up just like in this guide with the Hetzner CPX11 plan, at 4.75 euros per month. It has about 500-600 visitors per day and it’s resources are barely used. So it does pay to learn stuff and geek out sometimes. As far as I’ve tracked, I ‘lost’ under 6 hours this year in actually ‘managing’ anything in that server.
1. Buying the domain name
The domain name is the name of your webiste. It’s what people would type in their address bar in their browser to get to your website. For example, this blog’s domain name is www.techie-show.com.
To actually have one, you need to buy one, and renew it every year or couple of years depending on the period you choose.
Not that it matters that much, but I’d get a .com one. But really, anything will do. Just avoid the trippy ones like .xyz. They tend to be associated with spammers.
Just head over to Namecheap.com, search for your ideas and once you find one to your liking buy it.
Actually, buying and creating an account is similar to a simple online shopping spree at your favorite store.
2. Buying & configuring the cloud server
As I said, in this guide I will be using Hetzner Cloud services. You could use anything really. And with a bit of patience you’ll figure out how to do anything I do in this guide, in the control panel of any service provider. As most terms and operations are common.
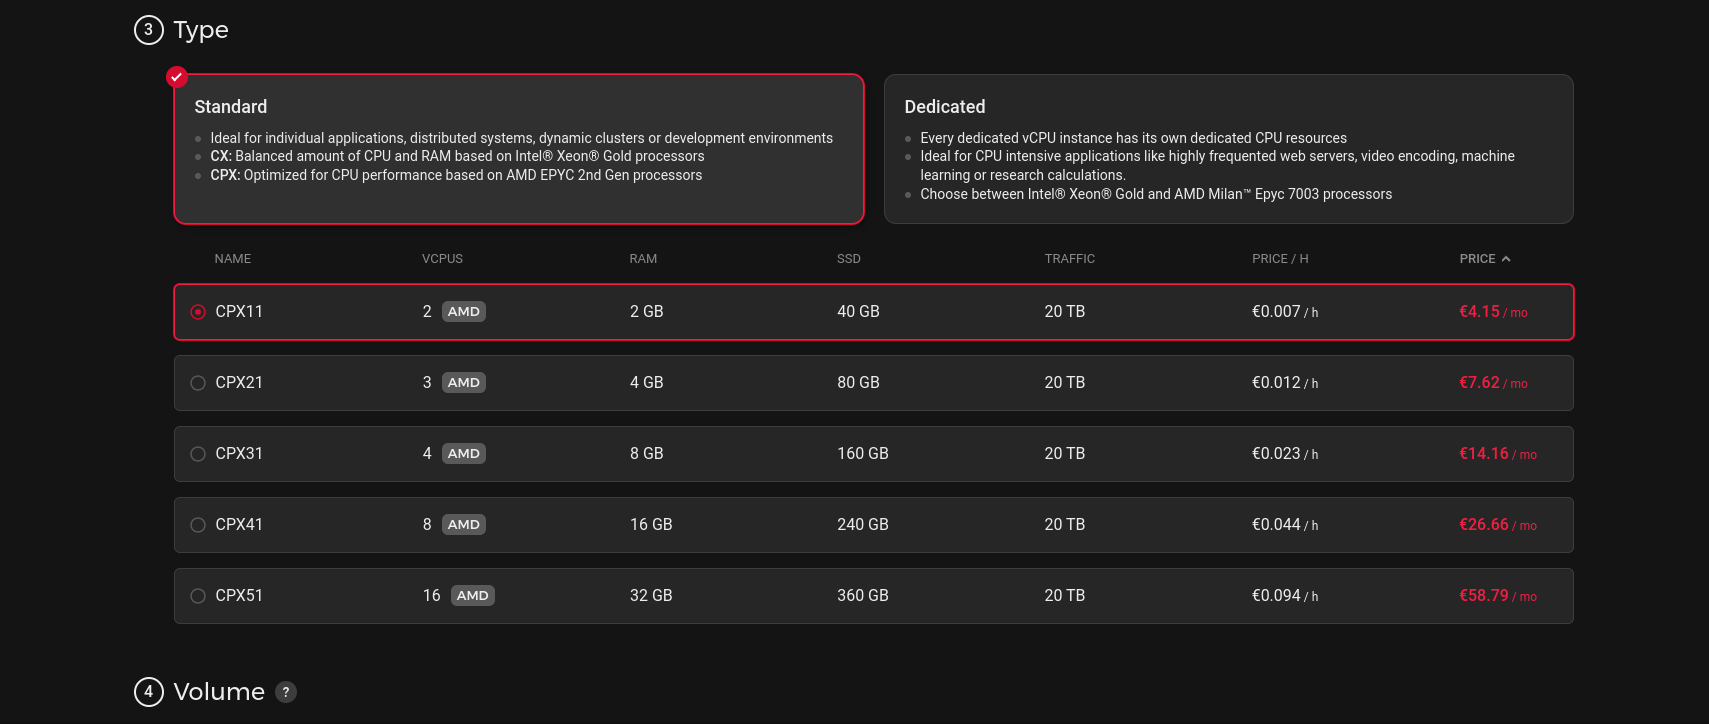
This being said, I am not a fan of buying the cheapest option. I always try to go at least one step above, just in case. So I will use a CPX11 plan in this guide, a plan that includes 2 vCPU’s and 2 GB of RAM. Plenty of horsepower for a new website. Plenty of horsepower even if you will get a good amount of traffic in the future.
a. You will need to make an account first and foremost.
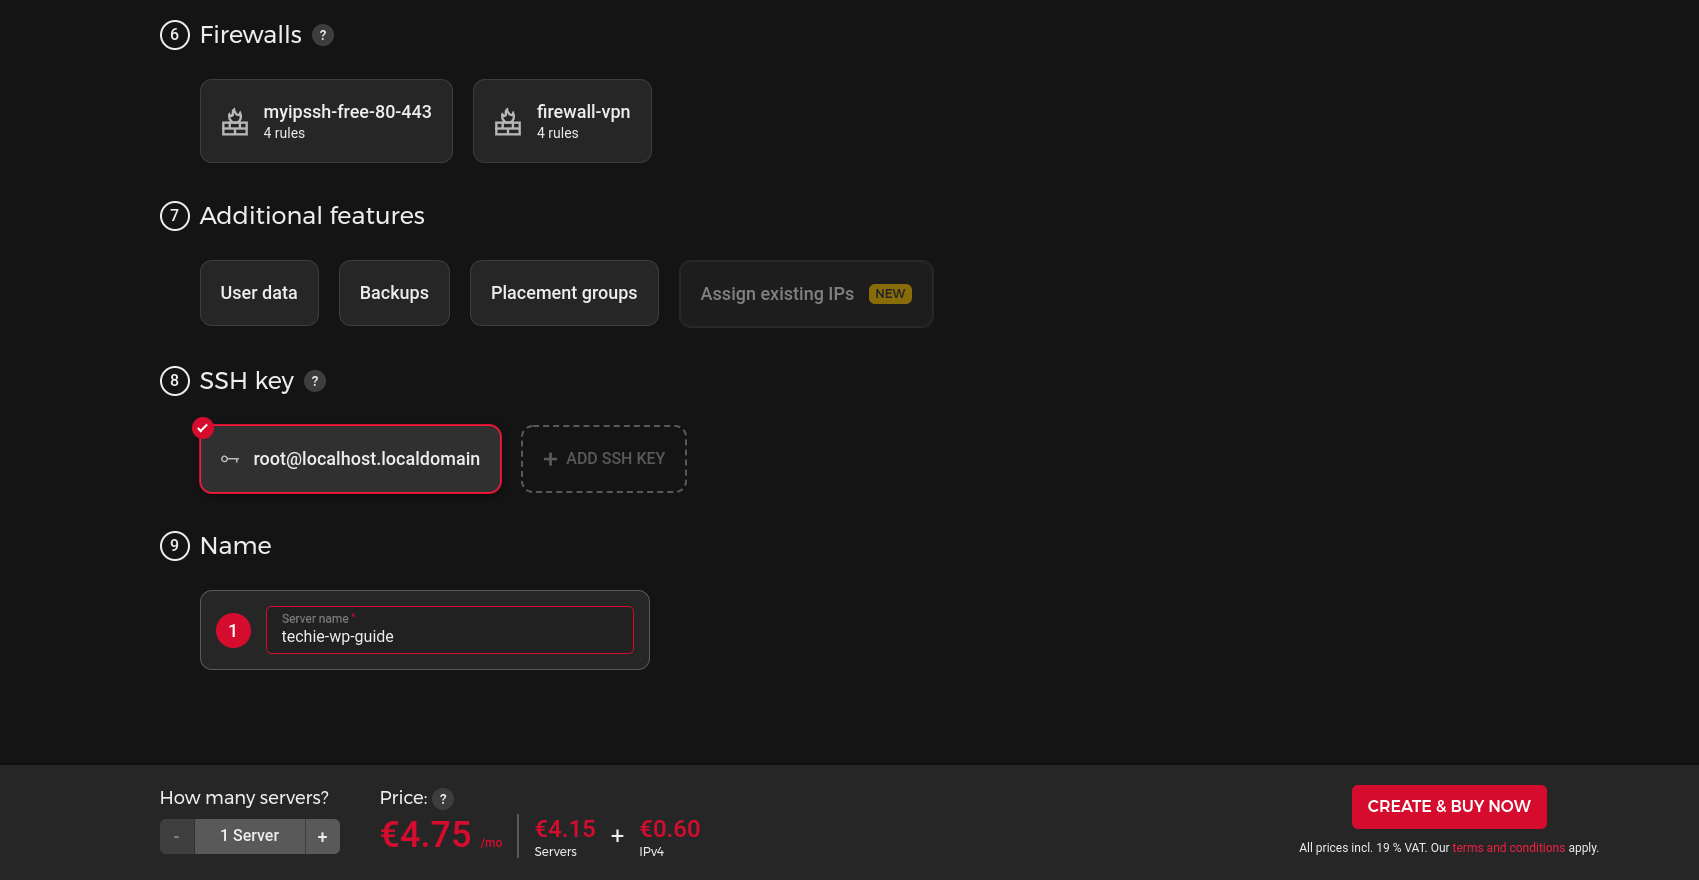
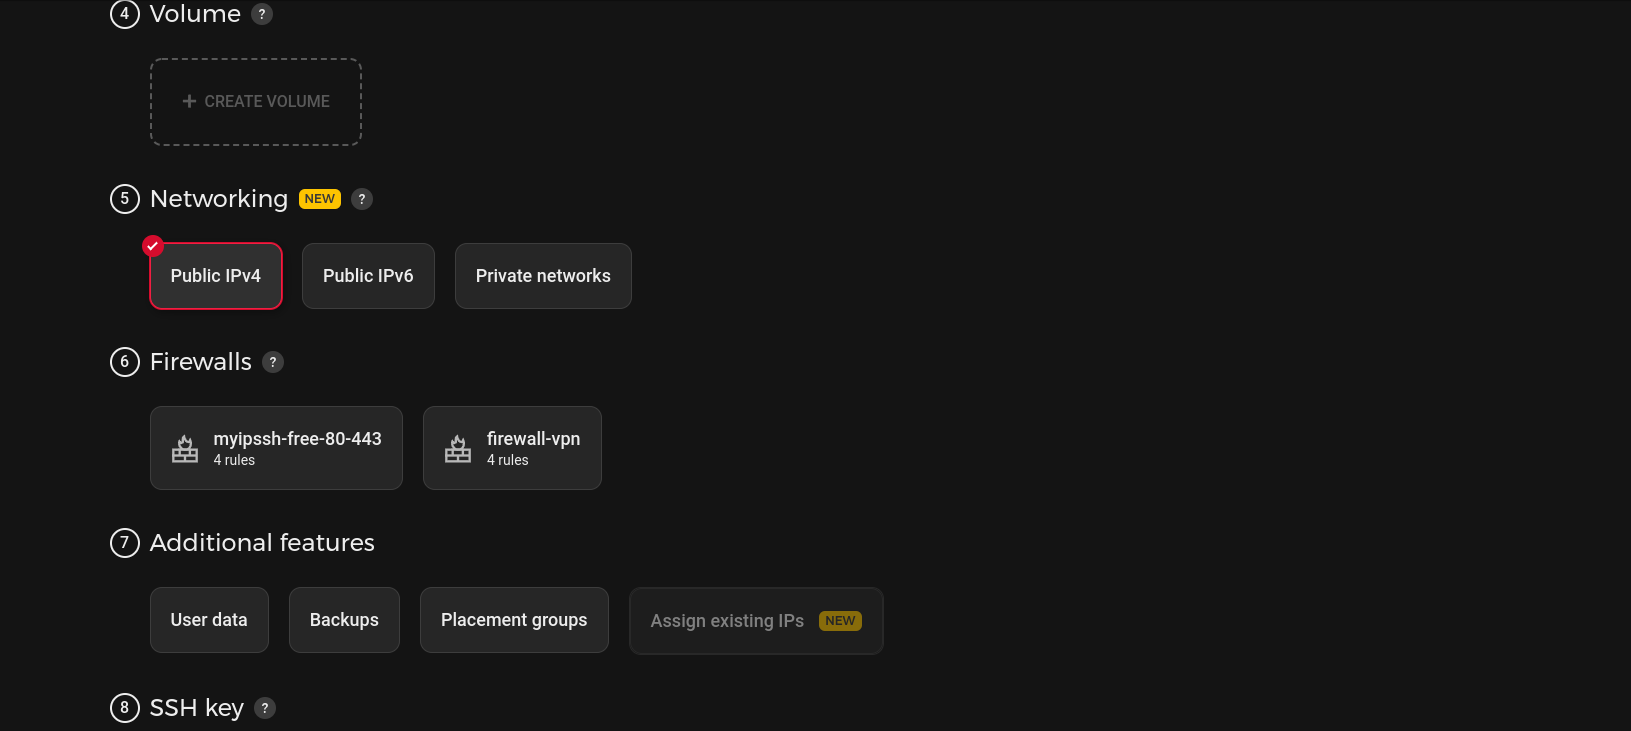
b. Configure your server:
- we’ll choose Ashburn, VA as the location
- Fedora 36 as an OS
- Standard type and CPX11
- In the volume section we do nothing,
- in the networking section just leave IPv4 checked;
- we’ll deal with firewalls later
- additional features are pretty cool, but not needed now;
c. Generate an SSH key for your server for extra security
Instead of just using a password, I urge you to use a SSH key to log in into your server. Creating a SSH key in the open SSH format is quite easy.
Here is a guide on how to generate a SSH key pair in Linux, Windows 10 or Windows 11.
After getting the keys, you’ll use your public SSH key in the step 8 of that page on Hetzner. Just open the public SSH key (the file that has .pub as an extension) with a text editor and copy-paste the key into that field. Name it something suggestive.
d. Name your server (only you see this name, so be descriptive)
e. Click Create & Buy Now.
After 1-3 minutes, your server is ready! And you can begin doing stuff!
Here are some images depicting the above configurations:

Aaand it’s done!

3. Installing the LEMP stack
LEMP is basically Linux, Nginx, MySql, and PHP. And you can read more about the concept of LEMP here.
In our server, the LEMP stack will be run by Fedora 36, Nginx, MariaDB, and PHP 8.1.
So let’s begin.
Connect to your server
Using your favorite SSH client or just the Terminal, connect to your server. I’m going to use the Terminal, as I’m writing this from a PC that is running Fedora.
Now, considering we’re using key-based authentication if the public key (file with .pub) was put on the server, we need to use the other key (private), in order to log in to our server.
So we use the following command:
ssh -i /location/to/the/key root@serverip -p 22Or in my case:
ssh -i /home/sinner/id_rsa root@5.161.106.xxx -p 22Where /home/sinner/id_rsa is the location of my key ‘id_rsa’ being the name of the key. And 5.161.106.xxx is my server’s IP.
And we’re in!
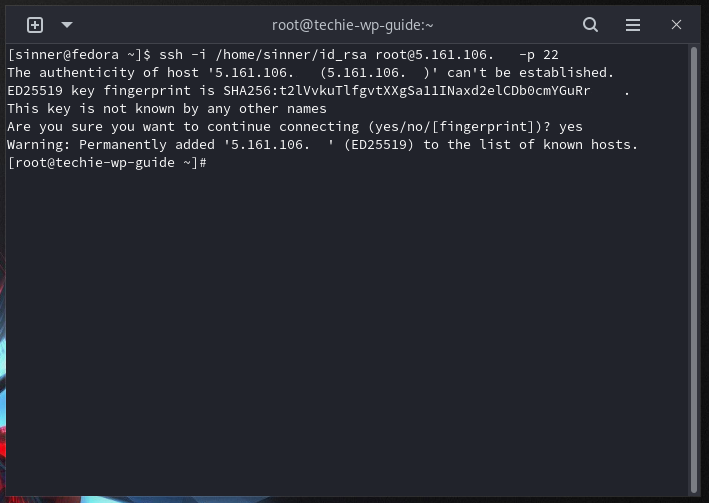
As you can see in the image above, we’re logged in as root on the ‘techie-wp-guide’ server in my case.
Update
A good practice is to make sure everything is up to date before we begin.
This command will show us the available updates:
dnf updateIf we’re met by the ‘Nothing to do.’ message, we’re good. Otherwise, just press ‘y’ and let it update.
I like to use Nano as a text editor, so if you’re not keen on another editor, you can install it by running the command:
dnf install nanoInstall Nginx
Installing Nginx is quite easy. If you’re using the -y argument, it will auto-install, and you won’t be asked if this is ok. (I guess it speeds things up a bit?)
dnf install nginx

or

dnf -y install nginx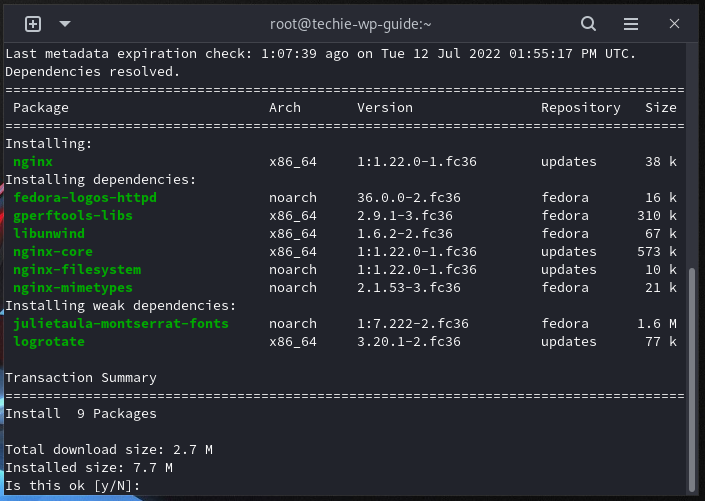
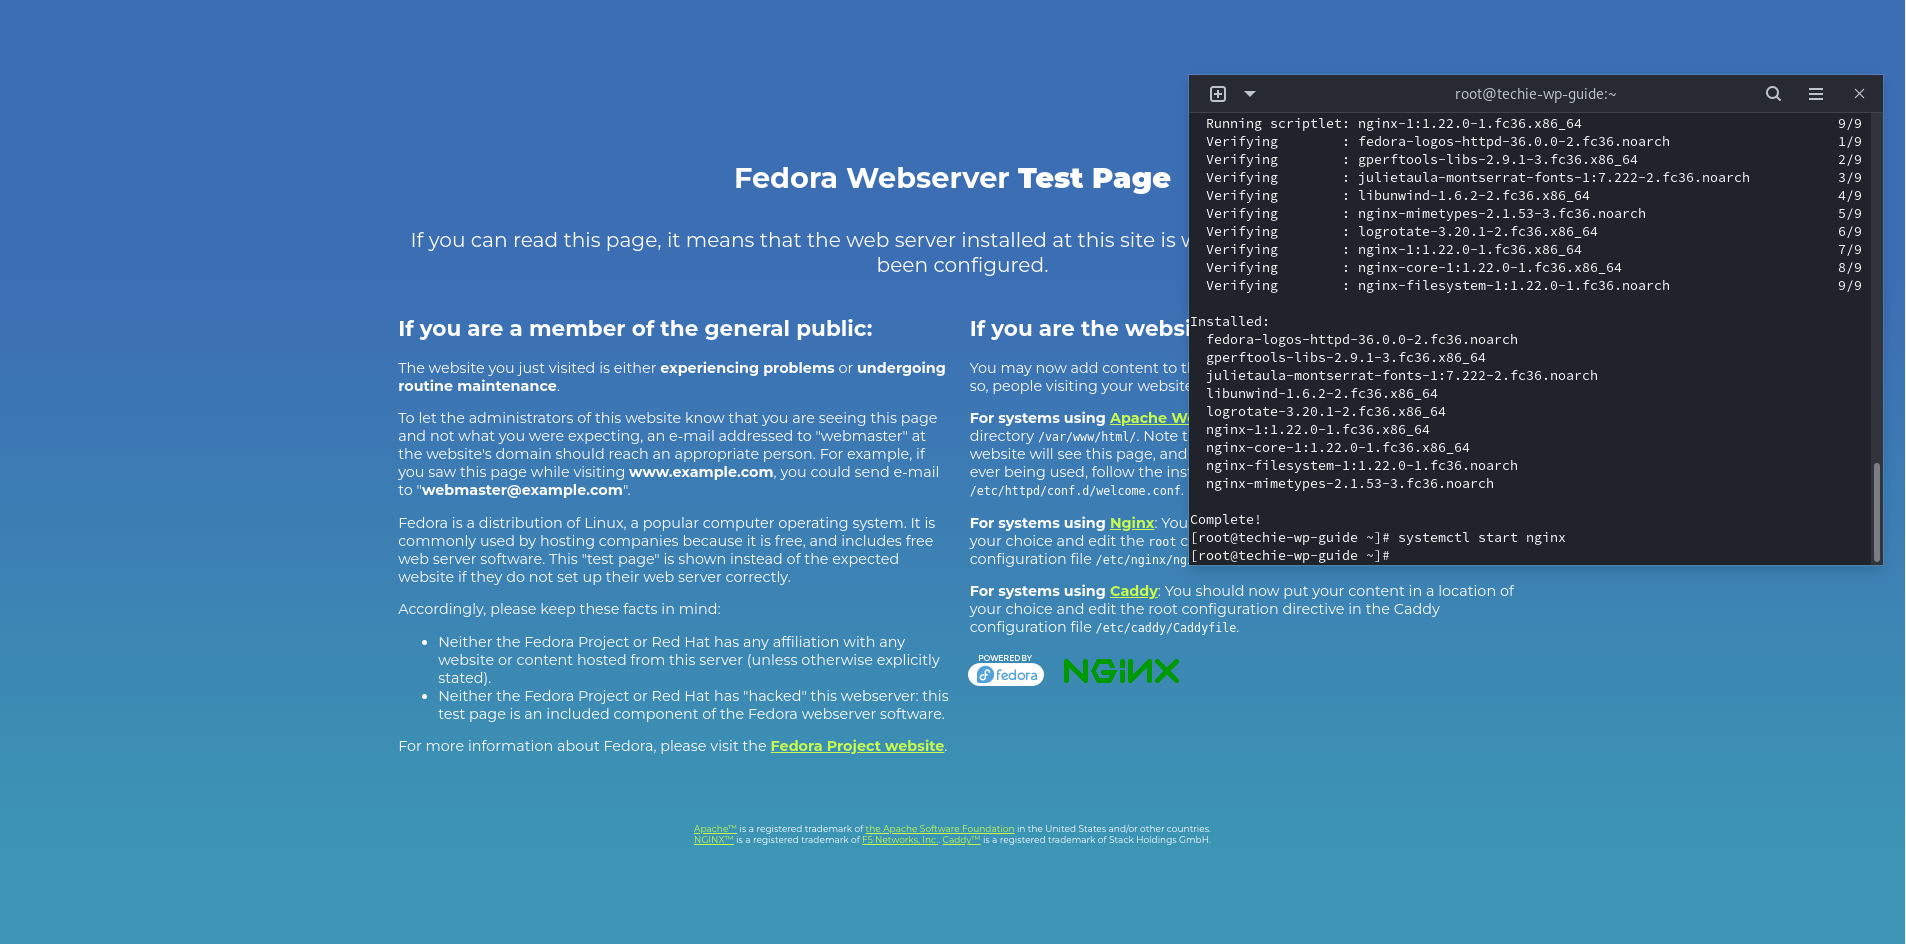
Now we need to start the Nginx service:
systemctl start nginxAnd if we would just navigate to our server’s ip in a browser, we would get a standard Nginx page. On Fedora it usually looks like this:
Now we need to enable the Nginx service, so it automatically starts on system start.
systemctl enable nginxInstall MariaDB
We’re going to install MariaDB as it can handle Wordpress and sufficient traffic just fine. Now let’s install the 10.7 version:
dnf module -y install mariadb:10.7/serverBam!
Let’s set the default charset to UTF-8. We need to create a new file, named charset.cnf. This is to avoid Mariadb being in latin1 mode.
So do this:
nano /etc/my.cnf.d/charset.cnfAnd in the new screen, basically the new file, just put this:
[mysqld]
character-set-server = utf8mb4

[client]
default-character-set = utf8mb4
CTRL+O saves the file in Nano, and then you can press CTRL+X to exit the text editor and get back to the terminal.
Let’s enable and start mariadb:
systemctl enable --now mariadbAs you can guess, the –now parameter is the one that also starts the mariadb service. If you’d like to check if it indeed started, just enter the following command:
systemctl status mariadb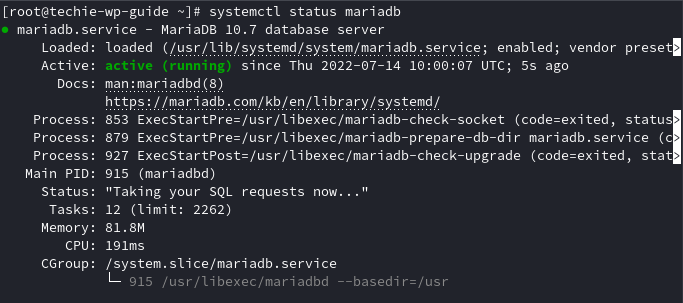
The green ‘Active: active(running)’ status tells us that it is working. CTRL+C to exit this screen.
We’re not done yet!
Let’s make the initial settings for MariaDB. Run the command:
mysql_secure_installationBelow is the whole process of this step:
[root@techie-wp-guide ~]# mysql_secure_installation

NOTE: RUNNING ALL PARTS OF THIS SCRIPT IS RECOMMENDED FOR ALL MariaDB
      SERVERS IN PRODUCTION USE!  PLEASE READ EACH STEP CAREFULLY!

In order to log into MariaDB to secure it, we'll need the current
password for the root user. If you've just installed MariaDB, and
haven't set the root password yet, you should just press enter here.

Enter current password for root (enter for none):
OK, successfully used password, moving on...

Setting the root password or using the unix_socket ensures that nobody
can log into the MariaDB root user without the proper authorisation.

You already have your root account protected, so you can safely answer 'n'.

Switch to unix_socket authentication [Y/n] n
 ... skipping.

You already have your root account protected, so you can safely answer 'n'.

Change the root password? [Y/n] n
 ... skipping.

By default, a MariaDB installation has an anonymous user, allowing anyone
to log into MariaDB without having to have a user account created for
them.  This is intended only for testing, and to make the installation
go a bit smoother.  You should remove them before moving into a
production environment.

Remove anonymous users? [Y/n] y
 ... Success!

Normally, root should only be allowed to connect from 'localhost'.  This
ensures that someone cannot guess at the root password from the network.

Disallow root login remotely? [Y/n] y
 ... Success!

By default, MariaDB comes with a database named 'test' that anyone can
access.  This is also intended only for testing, and should be removed
before moving into a production environment.

Remove test database and access to it? [Y/n] y
 - Dropping test database...
 ... Success!
 - Removing privileges on test database...
 ... Success!

Reloading the privilege tables will ensure that all changes made so far
will take effect immediately.

Reload privilege tables now? [Y/n] y
 ... Success!

Cleaning up...

All done!  If you've completed all of the above steps, your MariaDB
installation should now be secure.

Thanks for using MariaDB!
I bolded my answers, I recommend you configure it the same as I did.
Install PHP
We’re going to use PHP 8.1. The latest version. And the fastest. We’re trying to make a fast and modern WordPress installation and modern software can help us get the most out of our resources. Even if some older plugins or themes do not support PHP 8.1 (most serious ones do), I urge you to try and stick to the latest version of PHP.
Enter the command:
dnf install php
As you can see, Fedora 36 has PHP 8.1 as the default version of PHP. Great! (press y and enter to continue)
Now let’s just make sure our PHP installation has all the extensions needed by WordPress, so we won’t get any issues to WordPress itself or future plugins we’re going to install.
Enter the following command:
dnf install php-cli php-fpm php-curl php-mysqlnd php-gd php-opcache php-zip php-intl php-common php-bcmath php-imagick php-xmlrpc php-json php-readline php-memcached php-mbstring php-xml php-domAnd confim. This will ensure that we’ll have no issues down the line.
Now, a simple command will confirm we’ve sucessfully installed PHP 8.1:
php -vAnd it outputs something like this:

Now, in order to properly use php-fpm, as we’re going to do, we need to edit www.conf and make sure the user and group is set to nginx.
nano /etc/php-fpm.d/www.confBy default they are set to apache, and we want to change them to nginx.
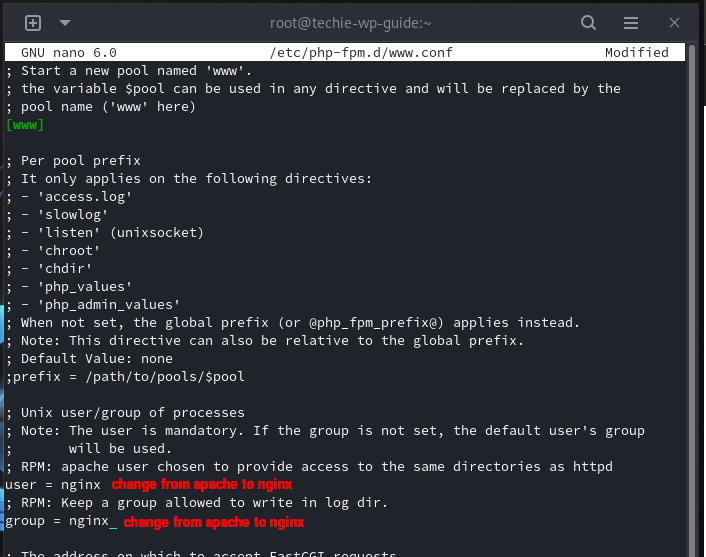
And then CTRL + O saves the file in Nano, and CTRL+X to exit the file.
Now let’s start and then enable php-fpm at boot:
systemctl start php-fpmsystemctl enable php-fpmAnd we’re good to go!
4. Configuring the LEMP stack
Congratulations if you’re made it up to this point, you basically have a LEMP stack installed!
Now we need to configure everything, we’re basically tie-ing everything up so we can install WordPress.
Configuring the domain
Since we’re using Namecheap and Hetzner, we need to add the domain into Hetzner’s DNS console, and then change the default Namecheap nameservers to Hetzner’s ones. This step is mandatory in order for our domain to actually take people to our server so they will see what you want them to (your new Wordpress installation).
After logging in into Hetzner’s DNS console, click ‘Add new zone’ and let it scan/do its magic.
You will then get three nameservers that you need to set up for your domain.
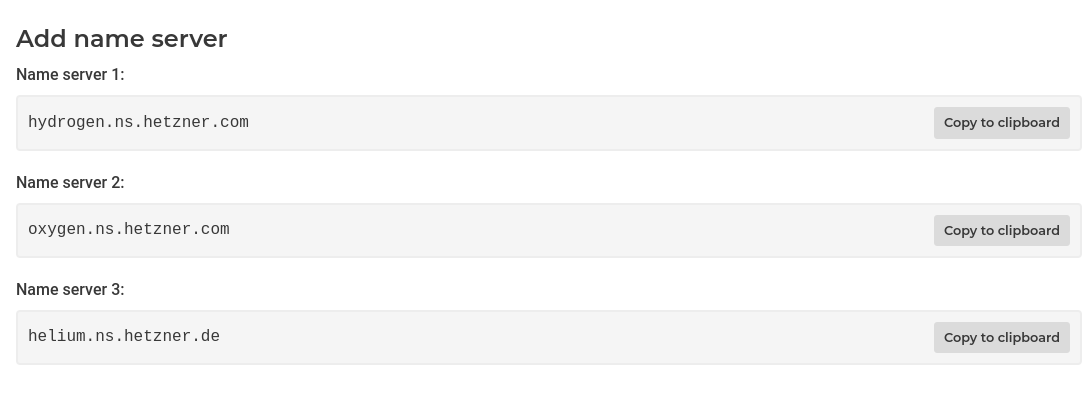
Now that we have the nameservers and our domain is added into Hetzner’s DNS console, we just need to add these into Namecheap.
This is fairly easy and similar in any domain registrar’s dashboard. Just go to your Domain List, and click Manage a certain domain.
Then in the Nameservers section, select Custom DNS and add the three nameservers in the fields. Here’s How it looks like:

And then just click on the green checkmark.
These settings might take a couple of hours until they are picked up (up to 24h). As far as my experience goes, it’s usually quite fast.
Configuring Nginx
Now we need to create the configuration for our domain. While we could just make a .conf file and be done with it, I urge you to set everything up to be ready in case you will want to host multiple WordPress instances on multiple domains from your server. So even if our cloud server will only host one domain with its WordPress installation at the moment, I’m going to create the structure and configurations so in the future, we can easily add another domain/website.
Let’s create the folder where our WordPress installation will reside:
mkdir /var/www/html/yourdomainAnd then just make a HTML file so at the end of this section you can see that everything is ok:
nano /var/www/html/yourdomain/index.htmlAnd write anything in that new file. I have written Ok. :)) Then save it with CTRL+O and exit with CTRL+X.
Let’s create a sites-available folder in our Nginx folder:
mkdir /etc/nginx/sites-availableAnd a sites-enabled folder for the websites that are enabled:
mkdir /etc/nginx/sites-enabledNow let’s create a .conf file fo(up to 24h)r our domain (yourdomain-com is the name of the file, just so you can remember to what domain/website this configuration applies to):
nano yourdomain-com.confInside this file, for the moment, we’re going to put the following:
server {
listen 80;

server_name yourdomain.com www.yourdomain.com;
root /var/www/html/yourdomain;
index index.php index.html index.htm;
access_log /var/log/nginx/yourdomain_access_log;
error_log  /var/log/nginx/yourdomain_error_log  warn;

location / {
try_files $uri $uri/ /index.php?$args;
}

location = /favicon.ico {
log_not_found off;
access_log off;
}

location ~* \.(js|css|png|jpg|jpeg|gif|ico)$ {
expires max;
log_not_found off;
}

location = /robots.txt {
allow all;
log_not_found off;
access_log off;
}

location ~ \.php$ {
include /etc/nginx/fastcgi_params;
fastcgi_pass unix:/run/php-fpm/www.sock;
fastcgi_index index.php;
fastcgi_param SCRIPT_FILENAME $document_root$fastcgi_script_name;
}
}
I’ve bolded what you need to change.
Now let’s make Nginx load the config file from our new sites-available folder. (in the future, it will load all the files from there, in case we’re going to set up multiple domains)
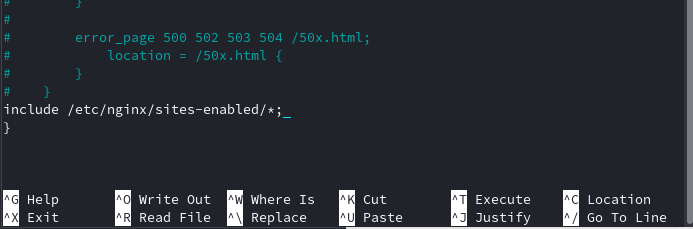
Edit the file located at /etc/nginx/nginx.conf, and right before the last closing curly brace, add the following:
Open file:
nano /etc/nginx/nginx.confAnd before the last curly brace add:
include /etc/nginx/sites-enabled/*;And save with CTRL+O (CTRL+X to exit after). And the end of that file will look like this:
Now we need to actually enable this file, by making it appear in the sites-enabled folder. We’ll do this by creating a symlink from the sites-available file to the sites-enabled file:
ln -s /etc/nginx/sites-available/yourdomain-com.conf /etc/nginx/sites-enabled/Now let’s make sure that everything is ok, by asking Nginx to test the .conf files:
nginx -tAnd we will get the OK, that looks like this:

Now just restart Nginx for the changes to be picked up.
systemctl restart nginxNow if you visit your domain, you will see the contents of that index.html file you created at the start of this section. In my case, Ok is all i get 🙂
Getting the database ready
We also need a database. This is where WordPress wil store stuff like the text from our articles, configurations and other stuff.
We’re going to: create a database, create a database user and then give the user permissions to work with that database.
Think of: a database name, a user name and a password. And note them down, you’ll need these things later. I’m going to refer to them as: yourdatabase, youruser and yourpassword in the steps below.
Let’s go to MariaDB just by typing this in our terminal:
mariadb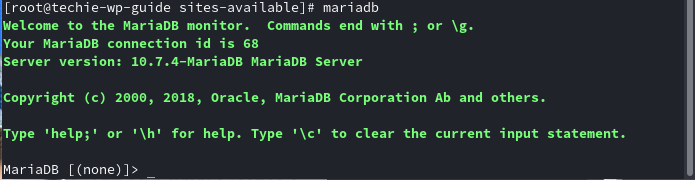
Now let’s create the database:
CREATE DATABASE yourdatabase;And now let’s create the user:
CREATE USER 'youruser'@'localhost' IDENTIFIED BY 'yourpassword';Give the user permissions to work with the database:
GRANT ALL PRIVILEGES ON yourdatabase.* TO 'youruser'@'localhost';Make sure the new privileges are being picked up:
FLUSH PRIVILEGES;Exit Mariadb:
exit;Bam! You now have everything needed to actually install WordPress. Let’s move on.
5. Installing WordPress
This is the actual fun part. Everything is coming together and we’re actually meeting WordPress! On our own cloud server! Yay!
Let’s download WordPress
First of all, let’s go to the folder created earlier, where our WordPress installation will sit. (point nr.4, at the begining of the Nginx configuration)
cd /var/www/html/yourdomainNow let’s download the official WordPress .zip here. Do not that at the time I’m writing this, the latest WordPress version is 6.0.1. I got the link to the zip archive in the command below, from this official link.
wget https://wordpress.org/wordpress-6.0.1.zipWe need to install unzip:
dnf install unzip -yThe actual unzipping:
unzip wordpress-6.0.1.zipAnd as you can see, we do have WordPress unzipped, but it’s in a wordpress folder. Let’s fix that and then clean up.
mv /var/www/html/yourdomain/wordpress/* /var/www/html/yourdomain

## this moves the files from the wordpress folder to above
rm -d wordpress
## no need for the empty wordpress folderrm wordpress-6.0.1.zip
rm index.html
## no need for the zip and the test html file, clean up after yourself!Now navigate to your domain in a new tab.
You’ll see the following greeting:
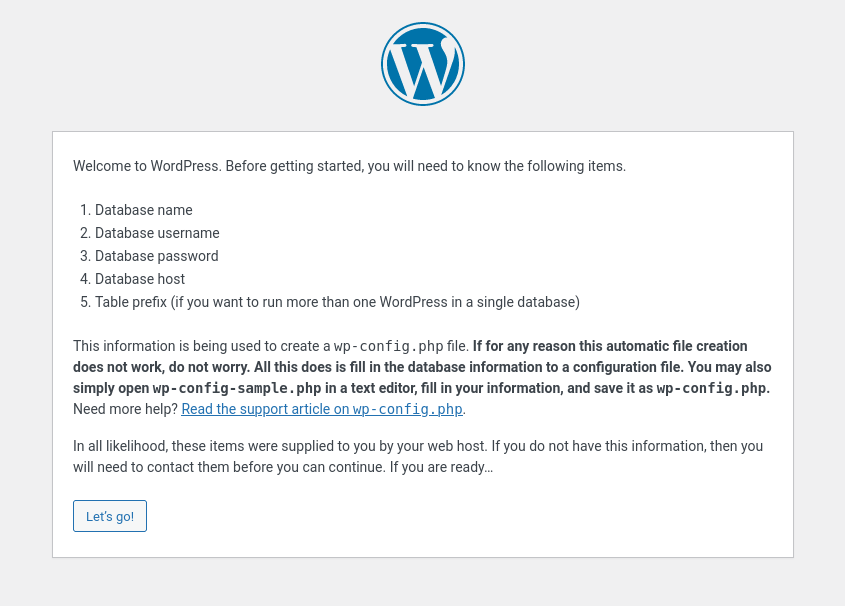
Press Let’s go!
Now you’ll need to fill in the Database Name, Username and Password fields with the database information. The ones you should have noted in the previous steps when we created the database. I’d also change the prefix from wp_ to something else. Like j3c_ or whatever.
After this, you’ll be prompted that the installer cannot write to the wp-config.php file. No biggie! Just copy that whole text (in what window) and let’s go to our server. (do not close the tab, we’ll get right back to it)
While in your installation’s folder, type:
nano wp-config.phpPaste the text suggested by the installer, CTRL+O to save and CTRL+X to exit. Now click Run the installation in the tab you have open.
And you’ll be greeted with the screen where you set up some basic stuff about your WordPress installation. Mind the Username and Password fields. Make sure you remember these (save them somewhere), as you’ll need them in the future to log in into the WordPress Dashboard and modify/add content and stuff to your website or blog. And never use an easy to guess password. Never!
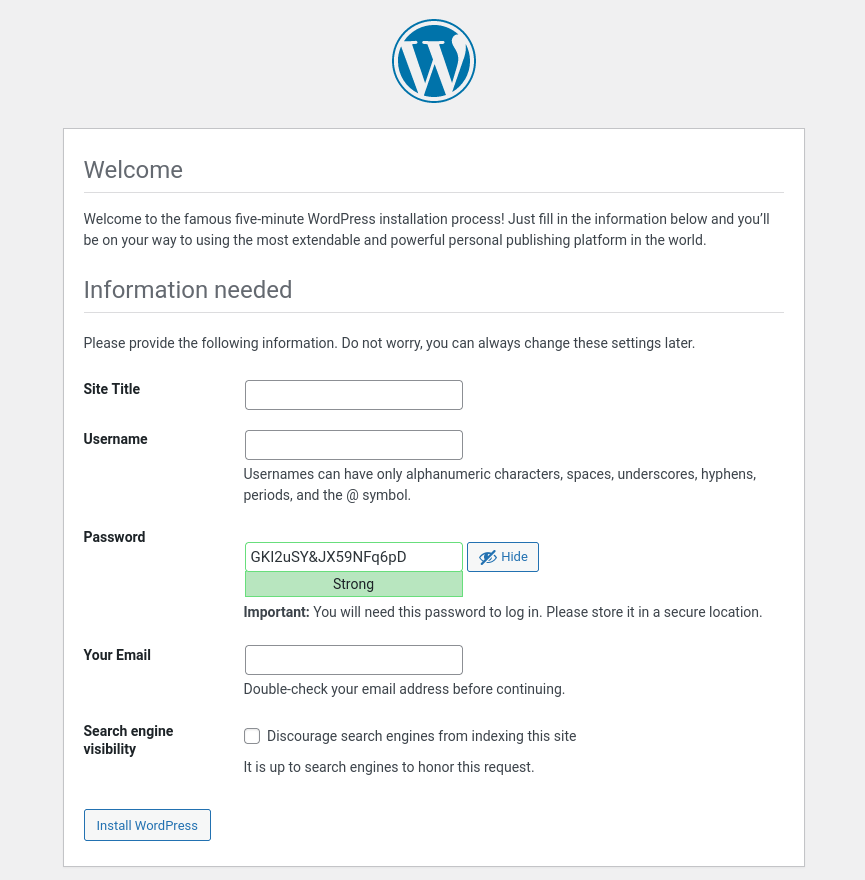
Now click Install WordPress, then Log in and bam! You’re in the Dashboard!
We’re not done yet!
Let’s set the appropriate permissions to the files and folders in our installation. This is done in order to secure and ensure proper functionality of our WordPress installation.
First, make sure you are in the proper folder, the folder in which WordPress is installed!
If in doubt, just use cd /var/www/html/yourdomain command again.
find . -type d -exec chmod 775 {} +find . -type f -exec chmod 664 {} +chmod 600 wp-config.phpFor updating and installing themes & plugins straight from the dashboard, it’s easier to just give Nginx the permission to modify files with this command:
chown -R nginx:nginx /var/www/html/yourdomainNow it’s time to secure everything so we won’t get into trouble.
7. Securing everything
Before we take our time customizing our website or blog and get to writing content and whatever you want your WordPress installation to have, we need to secure everything.
Word before: by a block in Nginx config file, I mean something that has directives between curly braces. So if you see that I mention ‘server block’, I refer to the fact that you must paste that code block between server { pastehere }.
Securing WordPress
There are some very easy steps to take in order to make sure you won’t get into trouble and fend off most of the malicious robots and people out there.
I will comment with ## where the code fragment must be inserted.
1.Do not allow php files to be directly ran in wp-content,wp-includes etc.
location ~* /(?:uploads|files|wp-content|wp-includes|akismet)/.*.php$ {
    deny all;
    access_log off;
    log_not_found off;
}

##server block in your site's configuration file (yourdomain-com.conf)
2.Don’t log unnecesary data. Achieved by having access_log off and log_not_found off in the rules where we have deny all as a clause.
3.Block xmlrpc.php if you’re not using it. If you don’t know you are probably not using it.
location = /xmlrpc.php {
	deny all;
	access_log off;
	log_not_found off;
}

##server block in your site's configuration file (yourdomain-com.conf)
4.Disabling directory listing
autoindex off;

## location / block in your site's configuration file (yourdomain-com.conf)
5.Hide dotfiles like .htaccess, .user.ini and others. Just in case
location ~ /\.(svn|git)/* {
    deny all;
    access_log off;
    log_not_found off;
}
location ~ /\.ht {
    deny all;
    access_log off;
    log_not_found off;
}
location ~ /\.user.ini {
    deny all;
    access_log off;
    log_not_found off;
}

##server block in your site's configuration file (yourdomain-com.conf)
6.Hide Nginx version and php version. Not that security through obscurity is a solution, but as it’s easy to do, why not?
fastcgi_hide_header X-Powered-By;
proxy_hide_header X-Powered-By;

## php block
server_tokens off;
## in /etc/nginx/nginx.conf, as we want it to be applied everywhereSSL certificates using Let’s Encrypt
Every modern website needs an SSL certificate. Thankfully, we can use Let’s Encrypt as it is free!
Let’s begin by installing Certbot:
dnf install certbot -ydnf install python3-certbot-nginx -yLet’s issue a certificate for our domain:
certbot --nginx -d yourdomain.com,www.yourdomain.com

## it is very important to issue your certificate for the www and non-www versions. This way, all the redirects will work properly, and for SEO purposes any version of what an user could type, wil take them to https://yourdomain.com
It will ask for an E-mail address. Input valid one as it can announce you for urgent renewals and security notices.
You then need to accept terms and if you want, to share your e-mail with the Electronic Frontier Foundation.
Now, Certbot automatically tries to renew all certificates when they are about to expire.
To test if this works, you need to do a dry run:
certbot renew --dry-runAfter about 1 minute it will finish and you should see this message: “Congratulations, all simulated renewals succeeded”. All good now, your domain will have it’s SSL certificate renewed.
Now, the SSL version of your website has it’s own server{} block in the .conf file. It can be spotted by the ‘listen 443 ssl’ line in the .conf file. You should make the security blocks mentioned above are in this new server section, as Certbot automatically makes your website available only in HTTPS mode. And that is a good thing, we like that.
I must admit that it handled everything beautifull in my test while writing this, as all my adjustments were kept and automatically present in the SSL version. Great!
Adding headers
These headers should be added in your domain’s .conf file. As refered above in the guide yourdomain-com.conf.
1.HSTS: As our website will only be available in HTTPS mode, as we want everything up to modern standards and secure, we should also add the HSTS header.
In the 443 server block, add this:
add_header Strict-Transport-Security "max-age=31536000; includeSubDomains" always;I usually add it after the line that refers to ssl_dhparam.
2.Upgrade insecure requests: a good security measure.
After the HSTS header above, just add this on a new line:
add_header Content-Security-Policy upgrade-insecure-requests;3.Referrer-Policy header: it’s good practice to have it set up.
Just like the above header, on a new line, add this:
add_header 'Referrer-Policy' 'same-origin';4.Add X-Frame-Options header: defends against clickjacking.
Just like above, add this on a new line:
add_header X-Frame-Options "SAMEORIGIN";Now to actually apply the latest modifications to the .conf file, you must restart Nginx.
systemctl restart nginxAnd if you want, you can check if the headers were sucessfully aplied using this website.
Enabling HTTP2
HTTP2 is a major improvement over the standard HTTP protocol, and it brings significant improvements in eficiency, speed and security. It is supported by most browsers and enabling it in Nginx is very, very easy. So let’s go for it!
Edit your site’s .conf file:
nano /etc/ngninx/sites-available/yourdomain-com.confAnd find the line that states listen 443 ssl; and add http2 to it.
listen 443 ssl;

becomes

listen 443 ssl http2;
CTRL+O to save the file in Nano editor and then CTRL+X to exit the file.
Now just restart Nginx and bam! You server has HTTP2 enabled!
systemctl restart nginxAnd you can verify that HTTP2 is working properly using KeyCDN’s test here.
Fail2ban
Fail2Ban is an amazing daemon service that can help protect our whole server. How it does its job is fairly easy to understand:
- It monitors log activity based on a pre-defined pattern.
- It checks against ban criteria like number of attempts to do something or errors in a certain period of time.
- Creates an iptables rule to block the related ip for a period of time.
Let’s install Fail2ban and configure it to protect your server and your WordPress login page. We want it to look for IP’s that spam 404 (aka non existant stuff) and 403 errors, as well as our wp-login.php page and SSH port.
Installing Fail2ban is as easy as:
dnf install fail2ban -yLet’s start fail2ban and enable it so it will start at system boot.
systemctl start fail2ban

systemctl enable fail2ban
The minimum stuff you need to know before setting up fail2ban jails:
- bantime: how much, in seconds, will that IP address be banned. The default is 600 seconds (10min);
- findtime: the window of time in wich fail2ban will pay attention when looking for repeating offenses by a certain IP; default is also 600 seconds;
- maxretry: the number of failed attempts allowed within ‘findtime’ before a ban with the duration of ‘bantime’ is issued;
So that’s about it.
Protecting against random 4xx requests
Now, we need to create a filter that will tell fail2ban what we don’t like. We’re going to monitor 404/444/403/400 requests, specifically GET and POST requests.
Create a new file:
nano /etc/fail2ban/filter.d/nginx-4xx.confAnd put this inside:
[Definition]
failregex = ^<HOST>.*"(GET|POST).*" (404|444|403|400) .*$
ignoreregex =
Save the document and let’s make our jail.
nano /etc/fail2ban/jail.localAnd put this inside:
[sshd]
enabled   = true
port    = ssh
logpath = %(sshd_log)s
backend = %(sshd_backend)s
bantime = 1200
maxretry = 10
findtime = 600

[nginx-4xx]
enabled = true
port    = http,https
filter  = nginx-4xx
logpath = /var/log/nginx/yourdomain_access_log
bantime = 1200
maxretry = 10
findtime = 600
Do change the yourdomain_access_log to the name of the access log of your domain, from /etc/nginx/sites-available/yourdomain_com.conf.
We’re basically stating: ban for 20min (1200 seconds) any IP that within 10 minutes breakes our rules more than 10 times. Oh, and apart from protectic our webspace against those anoying 4xx requests, we’re also protecting the ssh port. Just in case.
With the following command, we can see the number of jails active:
fail2ban-client statusAnd we’ll get 2: nginx-4xx and sshd. Bam.
And if you just try to generate some stupid error like going to yourdomain.com/whatever.php, you’ll get a 404 error in the browser. But if you use the command:
fail2ban-client status nginx-4xxYou’ll see that it has seen that 404 error and it is monitoring. If you would go crazy and spam with 404 errors, you’d get banned for 20 minutes.
Now, in order to not get banned on your own server, you can add your IP to the ignoreip setting above. But this really only works if you have a static IP from your ISP. But of course if you hit the 404 filter for example, you can log into your server (ssh) and add your IP to the ignoreip list or just run the following command:
fail2ban-client set nginx-4xx unbanip youripProtecting our WordPress login against brute-force
Let’s make the jail:
nano /etc/fail2ban/jail.local

and add this to the end of that file:

[wp-login]
enabled = true
port = http,https
filter = wp-login
logpath = /var/log/nginx/yourdomain_access_log
bantime = 1200
maxretry = 3
findtime = 600
As you can see, I have set the maxretry to 3. Because really, you should know your login and password. And 3 times is more than enough headroom in case of a mistake. (like Caps on or something)
Now let’s make the filter. Create new file and fill in the contents:
nano /etc/fail2ban/filter.d/wp-login.conf[Definition]
failregex = ^<HOST> .* "POST /wp-login.php HTTP.* 200Save the file and then restart fail2ban for the rules to apply.
systemctl restart fail2banRunning ‘fail2ban-client status’ again, will show that we have 3 jails now.
And mistaking a login, will show up when we try to log in into WordPress. (fail2ban-client status wp-login)
Final .conf file for your WordPress site
7. Finishing WordPress configuration
There is so much to say here that it could be an article on its own. But I’ll go over it quickly, to get you started on a basic website or a blog.
Some basic plugins
- Askimet: amazing against spam if you have comments open or contact forms;
- Yoast SEO: the free version does a pretty good job;
- Anti-Malware Security and Brute-Force Firewall: you can periodically scan your wordpress install for malicious code. Useful if you install stuff from strange sources;
- Disable All WordPress Updates: I preffer to be in control of updates. This disables the auto updates completely;
- Ultimate Blocks: so useful! It has a block for common needed stuff for a blog: a table of contents, share to social media, and many many more. Including a Review block (did I mention it also adds the appropiate schema for SEO purposes on most blocks that make sense to have it?);
A theme
This is tricky. What you need to know, is that there are two types of WordPress templates: free ones, and paid ones. Often times the paid ones are called premium. Make no mistake, there are bad and far from premium paid themes out there!
Some free WordPress themes I like: Free version Astra, Free version GeneratePress, ChromeNews, Zeever, Pathway.
A few paid templates I’ve worked with and were great: GeneratePress, Astra, Porto, Salient and Flatsome.
A lot of premium themes offer demos and the ability to import a certain demo to replicate the look. Do make sure you remove all the demo content or replace it.
8. Stack optimizations
GZIP
You need to enable GZIP compression. This will speed up your website a great deal. And it is quite easy.
Add the below code in the server context, so not in a location block:
gzip on;
gzip_disable "msie6";
gzip_vary on;
gzip_proxied any;
gzip_comp_level 6;
gzip_buffers 16 8k;
gzip_http_version 1.1;
gzip_types application/javascript application/rss+xml application/vnd.ms-fontobject application/x-font application/x-font-opentype application/x-font-otf application/x-font-truetype application/x-font-ttf application/x-javascript application/xhtml+xml application/xml font/opentype font/otf font/ttf image/svg+xml image/x-icon text/css text/javascript text/plain text/xml;
I’ve added it right after the robots location block.
So this
location = /robots.txt {
allow all;
log_not_found off;
access_log off;
}
Became this
location = /robots.txt {
allow all;
log_not_found off;
access_log off;
}
gzip on;
gzip_disable "msie6";
gzip_vary on;
gzip_proxied any;
gzip_comp_level 6;
gzip_buffers 16 8k;
gzip_http_version 1.1;
gzip_types application/javascript application/rss+xml application/vnd.ms-fontobject application/x-font application/x-font-opentype application/x-font-otf application/x-font-truetype application/x-font-ttf application/x-javascript application/xhtml+xml application/xml font/opentype font/otf font/ttf image/svg+xml image/x-icon text/css text/javascript text/plain text/xml;
And now you need to restart Nginx for the settings to apply.
Optimize PHP
To edit some of the common PHP settings, you must look in the php.ini file:
nano /etc/php.iniWhat we’re looking for:
realpath_cache_ttl = 240
memory_limit = 128M
max_input_vars = 5000

## Some themes might recommend increasing max_input_vars, max_input_time and even max_execution_time. In this php.ini file you can find these variables. Just don't forget to set them back to a properly sized value, as it is not safe to have them too 'loose'.

## don't forget to uncomment the lines mentioned by making sure they don't have the ; symbol.
Optimize OPcache
If you are basically done with the website/blog and all you will do is add content (blog posts) or not even that if it is a presentation website. It means that your php files will not suffer modifications.
To edit OPcache configuration, edit the following file:
nano /etc/php.d/10-opcache.iniUncomment the following lines by removing the ; symbol and adjust the values to be like below:
opcache.memory_consumption=128
opcache.interned_strings_buffer=8
opcache.validate_timestamps=0
Warning! While setting validate_timestamps to 0 will increase performance, if you add a new plugin, modify a theme .php file or upgrade WordPress (to a future version), you will need to restart php-fpm after. This is done like this:
systemctl restart php-fpmI usually prefer this, as I don’t often meddle with things and I want the speed boost.
But of course you could also just set this to something like 20 seconds:
opcache.validate_timestamps=1
opcache.revalidate_freq=20
Your call really.
Setting up the fastcgi_cache for amazing speeds
And here’s how to do it.
But if you want to use this stack and make it a little faster and don’t want to bother any more, you can install and activate the WP Super Cache plugin. It will speed things up a lot for your visitors. Your website will be fast enough until you actually get some decent traffic amount (and that can take some time).
Configure Cache Sniper or Nginx Helper plugin
If you’re using the above tip, the fastcgi_cache, you would find this helpful.
While you can clear the cache manually, configuring this plugin allows the FastCGI cache to be cleared when you publish or edit a post. This will need some aditional configuration. Article coming soon.
Enabling Brotli compression.
I’ve written about enabling Brotli compression here.
9. Final optimizations & ideas
Basic things to look out for
1. Big media files will not load fast, no matter the server. Try and keep your images under 500 KB. And don’t host videos on your own server. Try YouTube and embed them, a CDN like BunnyCDN (they also feature a player, streaming and anything you need for video content).
2. The more plugins you install, the slower things get.
3. Backup! Back up your WordPress database and files at least once a week. I usually keep only the 3 freshest backups. Just in case. It does not use up that much space and it is useful in case something goes terribly wrong.
That PageSpeed score
Honestly one of the easiest ways to reach a good PageSpeed score without stressing out too much is the WPRocket plugin. I have had a great deal of success with it on various WordPress themes. (GeneratePress, Astra, Porto, Salient, Flatsome and a lot of free themes too)
But making WProcket working properly with this set up requires additional work. I’ll write a dedicated article about this soon.
Other ways of optimizing is by using plugins that optimize resources like CSS/JS but do not cache the page, since we use the FastCGI cache and serve HTML files basically.
Or just manually minify all the CSS and JS files in your theme folder. (using Chrome Devtools – F12, you can go to Network and filter CSS and JS files. And refresh the page. Those are the files that were loaded)
The TLDR would be that a great PageSpeed score can be achieved and how fast/easy/expensive it would be depends on how much time you want to invest in it. If meddling and tinkering scratches your itch, you can do it on the cheap side but it will cost you time.
10. What’s next? Maintenance?
As your website evolves or grows, you might find a need or use for a CDN in the future. BunnyCDN is a great budget option or Cloudflare. This would be a great next step to offload some of the work off from your server and improve the speed a little if it’s a media-rich website. (lots of photos/videos/etc.)
And eventually you’ll either need a bigger package from Hetzner or just move to another host once you’re confident. Your call. But it will probably take a while as it is not exactly a walk in the park to reach an amount of traffic that will bring this setup to its knees.
What maintenance should you do?
Some things to keep in mind or do once in a while. I recommend checking at least once a month. But to be fair, I have had machines that I did not even log on to for over 6 months and everything was OK. So the maintenance on such a set up is not that tedious. At least not while you’re at a low traffic level and such a simple setup.
1. Backups. If you don’t use Hetzner’s backups and handle backups yourself, check that they are working. And if this is a server you really care about, have Hetzner back it up and have a backup procedure in place yourself. Just to be safe.
2. Check disk usage
For space usage, just use the below command and look on Use% column.
df -hFor read/write activity, use the below commands:
dnf install iotopiotop -oNow by checking, I mean look for obvious or strange issues. Like if iotop -o tells you your disk is writing 100 Mbps constantly for a minute and you are doing nothing, something might be wrong.
3. Check CPU/RAM usage
Linux has this great utility, top. So just run:
topAnd to see RAM memory usage you can use:
free -h4. Update your operating system and apps
On the Fedora 36 we’ve just installed using this guide, this command will do:
dnf update -y5. Check the logs
We’re looking for potential errors. If I haven’t written about the common erros you might spot in the logs (or not yet), Google them! You’d be surprised how fast you can find an answer to your problem.
Check the MariaDB log. It’s usually located in /var/www/log/mariadb/error.log
Check the Nginx error log, located at: /var/log/nginx/yourdomain_error_log
Check the PHP error log, located at: /var/log/php-fpm/error.log
These logs should cover all you need for the normal WordPress installation. And most of the times, nothing will arise if you’re not developing or some funky plugin has an error. But it’s good to know where these logs are located.
Monitoring your server and installation
For some fast, uptime monitoring set up, you could just use something like Uptime Robot. It also has a free plan so that’s pretty great as you can get notified if for some reason your website is down. And you can also see the average/min/max response time for the page you set up to check, with a 2 day history. Useful.
Additional tip: you could also set up some monitoring tool with a pretty dashboard. Article coming soon.
So how fast is this thing?
Well, I have configured it like this:
- Theme: GeneratePress Free with some minor customizations;
- Plugins: Yoast Free, Ultimate Bocks, Askimet and Disable Updates plugin;
- About 10 posts, 3 categories, 3 pages and one menu;
It’s a test installation and it’s only purpose was to make screenshots during this article.
Here’s the TTFB for it’s current state, without fastcgi_cache or any caching plugin, tested with KeyCDN:

So we’re pretty fast without any caching. I’d say that’s pretty great!
And here’s the same test, with the simplest and easiest caching method and low effort: WP Super Cache:
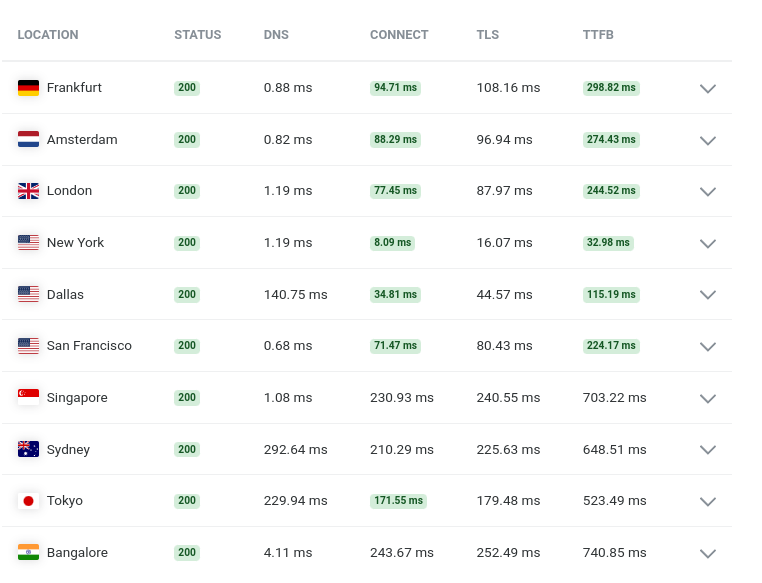
A good improvement for such low effort.
You’ll never reach very good speeds in some areas, due to distance from the host. But, there are CDN’s, premium DNS servers, and other things you can do to further speed up your stuff.
In Google Chrome DevTools, the TTFB (waiting for server response) is like this:
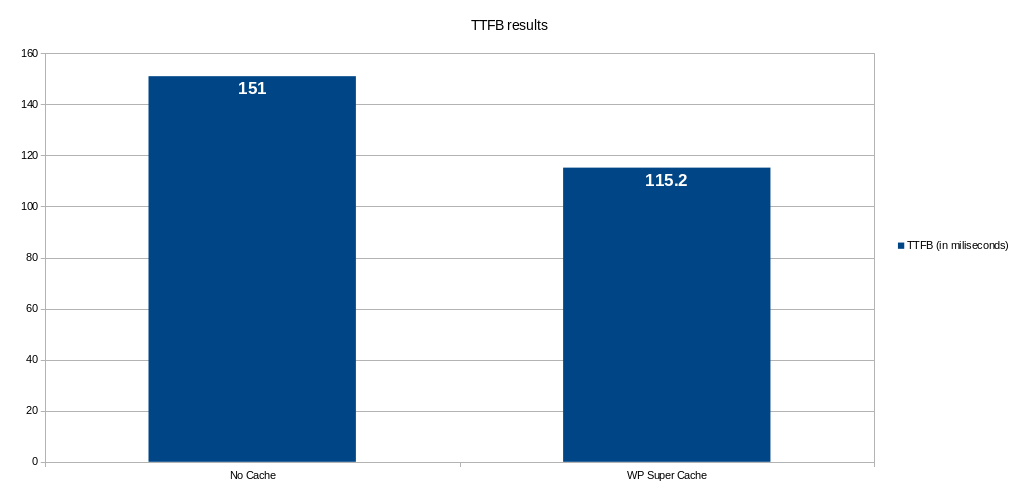
Mind you, the server is in Ashburn, VA and I’m in Romania. As a side-note for a similar set up but at Hetzner’s Helsinki location I constantly have <100ms TTFB with Wp Super Cache. And About 75ms with other setups.
And the Dashboard side is quite fast too: under 200ms TTFB, again in Google Chrome DevTools.
And here are some tests made with loader.io:


It is safe to say, that even in this state, you’ll need some good content or a decent amount of PPC traffic to bring your server to it’s knees due to ‘too many visitors’. Getting 200 clients per second, from any legit source (Google Ads, Facebook Ads, SEO, etc.) is quite a rare scenario and you’re certainly doing very well and should have some better setup than this guide.
The results are decent:
- 100-200 clients on 2 URLs for 15s: average of 141ms response time, no timeouts or errors;
- 20 clients/s on 2 URLs for 30s, average of 10ms. Wp Super Cache does its thing;
- 10 clients on 1 URL for 1 minute, 4ms. Again, Wp Super Cache was used;
To be fair, the loader.io tests are quite pointless as I didn’t push it too much. But there are a lot of tweaks that can be done to this server. I’ll add the links to those tips and tricks to this article as soon as they are ready. (like tuning php-fpm, etc.)
What to work on next?
I am going to constantly add the links as I write the how to’s. But there are a lot of things you can work on to make this stack faster/better:
- FastCGI Cache
- Enable Brotli
- Tune php-fpm process manager
- Redis Cache
- Some SSL settings tweaks
All done
I hope you managed to follow along. This is a huge article, but I figured that the table of contents and the fact that everything is in one place should make it easier to follow.
(you can bookmark a step in case you need to remember where you left of if you are not doing the whole process in one day/sitting – right click that step in the table of contents and copy url – bookmark that url so it will take you to that step when you need it)
Over time, I will keep referring to this guide and link from within this article to other advanced optimizations and tips. Be sure to revisit the blog or this article if you really found this useful.
And a warning: this is by no means a perfect stack. An ideal setup. The end of it all. But it’s a reliable and pretty good setup to get you started and useful to learn something new if this is/was the first time you were doing this. This exact configuration has been ‘battle-tested’ on small blogs (biggest one has >50k sessions per month. The only thing that has changed was the PHP version over time as PHP 8 and 8.1 came around). And it does the job pretty good, no hickups or awful loading times – this is why I actually decided to write this article… since this setup has been useful to me it can be useful to you too!


