


A refresher: undervolting refers to reducing the operating voltage of your GPU, preferably while maintaining the same level of performance.
Today you’ll find out how to undervolt your GPU for free, using the free utility, MSI Afterburner.
This guide works on Nvidia GPU’s that are Pascal or newer. So basically 1000 series and newer. It also works on some AMD GPU’s but I urge you to try Wattman if you’re running an AMD card as that utility works best for AMD GPU’s.
What we’ll achieve using this guide: lower GPU core temperatures without sacrificing performance and then we’ll take it a step further and actually increase the performance by about 8% while staying under the original temperatures.
This really is a long article, I feel you! But if you don’t want to miss anything, please take the time to read everything so you can achieve a stable undervolt.
Do note that I’ll be using a GTX 1050 Ti, so your mileage might vary. As this card is not that power hungry, the results will not be so spectacular. But a beefier card like a 1070 or 2070 will probably see much better results after undervolting.
Why undervolt my GPU? Who is this guide for?
If you’re running a small form factor PC or have set up a HTPC this might help you, because when crammed into tight spaces, GPU’s tend to overheat.
If you have poor airflow, or your power-hungry card just gets very hot, this might help you. Also, if you stress your hardware a lot and play demanding games for prolonged periods of time, this might help you too!
This guide might be helpful if you’re just looking to lower your GPU’s overall temperature and power consumption too! Read on.
How will undervolting provide better performance?
Video cards nowadays are pretty insane pieces of technology. Your Nvidia GPU comes with a feature called GPU Boost. This allows your GPU to overclock itself in order to get better performance if the operating temperature is safe and if the TDP allows it. As temperature increases, your GPU will decrease its core clock in order to maintain a safe operating temperature.
The problem is that this process is done gradually, and not at a certain temperature. That means that a card that reaches 80 degrees Celsius in a game, will perform slightly worse than if it were to reach a maximum on 70 degrees Celsius.
So basically, when talking about newer Nvidia GPU’s, the cooler, the better.
Software needed for undervolting
Every software listed below is free. So in order to perform a stable undervolt on your Nvidia GPU you will need the following programs:
- 3D Mark Time Spy / Unigine Heaven / Unigine Superposition – a benchmark that will stress your GPU;
- HWiNFO64 – to measure sensor readings (temperature, wattage, clock speed, etc.);
- GPU-Z – to find out your GPU specifications;
- Google Sheets or Microsoft Excel – basically a spreadsheet software to note your findings;
- MSI Afterburner – the tool we’ll be using to undervolt our Nvidia GPU;
And that’s about it! Neat! Let’s get started.
What we’ll be monitoring using HWiNFO
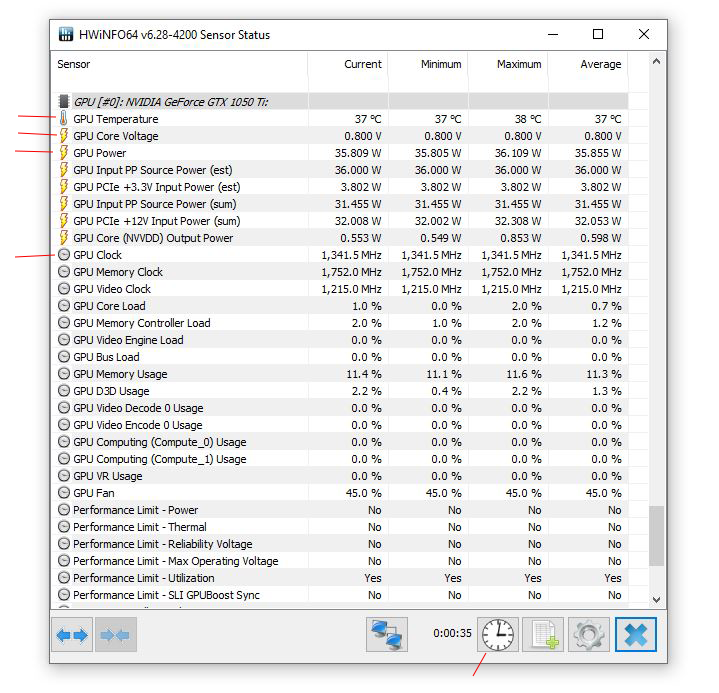
We have to keep an eye on several things in HWiNFO in order to see if what we’re doing actually works and how well does it work. (we’ll start HWiNFO in sensor mode)
We use HWiNFO as it shows us the information in four useful columns: current, minimum values, maximum values, and average values.
Always take note of:
- GPU Temperature – the current operating temperature of the GPU’s core;
- GPU Core Voltage – the current voltage of the GPU core;
- GPU Power – the current wattage usage of your GPU;
- GPU Clock – the current core clock;
- the little clock icon at the bottom. That resets the readings. You will have to reset the readings after each benchmark to make sure your readings are accurate;
How we’ll keep notes of things
Using your favorite spreadsheet software (Google Sheets or Excel probably) keep a tight note on the things I mentioned earlier in HWiNFO.
Mine looks like this:

The workflow / process of undervolting
I’ll outline the steps needed in order to ensure a good undervolt for your Nvidia GPU, or how I do it:
- Note the GPU Power (max value column), GPU Core Voltage (max value column) and GPU temperature while idle.
- Run a benchmark 3 times and make the average of the Graphics Score (sum up all the scores and divide by 3). Note it in the spreadsheet.
- Note the max GPU Power, max GPU Core Voltage, max GPU Temperature in the spreadsheet.
- Reset HWiNFO readings using the clock button.
- Apply a small undervolt – I recommend decreasing voltage in increments of 25mV.
- Repeat steps 2, 3, and 4.
- Decrease the voltage even more, with another 25mV.
- Repeat steps 2, 3, and 4.
- And repeat until you get artifacts on screen or a BSOD.
- After getting some errors, increase the voltage by 25mV (or reduce de undervolt by 25mW however you want to word this)
- Repeat steps 2, 3, and 4.
- If everything seems good and you are happy with the results run another type of benchmark (I like to combine 3D Mark Time Spy with Unigine Heaven). Run some games for at least 30 minutes.
- Everything stable and good? Good. You can now save the profile and if you want, set the new settings to apply at startup.
- Congrats! You’ve just undervolted your GPU!
I’ve followed this workflow on many GPU’s and every time the result was beautiful: lower temperatures, at the same or better performance. Win!
GPU Undervolt – the actual how to
Made it this far? Great! We’ll actually get to undervolt now!
Let’s get started!
Determine the target frequency of your GPU core
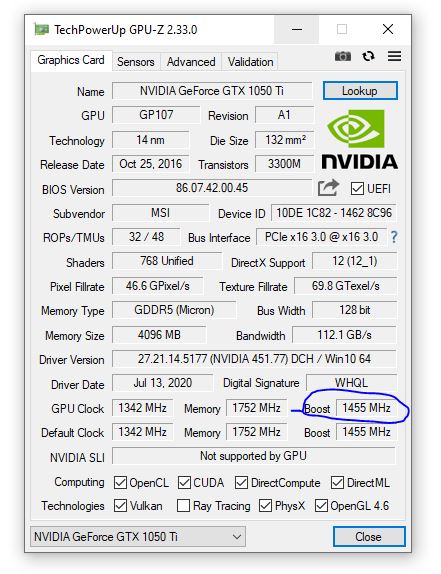
As I said, GPU boost will boost our card even past the advertised Boost Clock you see mentioned in GPU-Z or on your GPU’s box/manufacturer page.
Let’s take my card for example – it’s a GTX 1050 Ti, with a stock GPU clock of 1342 MHz and a Boost Clock of 1455 MHz. But while benchmarking or gaming, the GPU clock goes all the way to 1809 MHz. How come? Well that’s GPU boost.
So the first step is to start up HWiNFO and run a game or benchmark for just a couple of minutes. We just need to see how much your GPU will boost. Check the Maximum column of the GPU Clock. You’ll most likely see a figure higher than the Boost Clock mentioned in GPU-Z.
Why?
We’ll need this number in order to make sure we’re not decreasing the core clock of the GPU whilst undervolting.
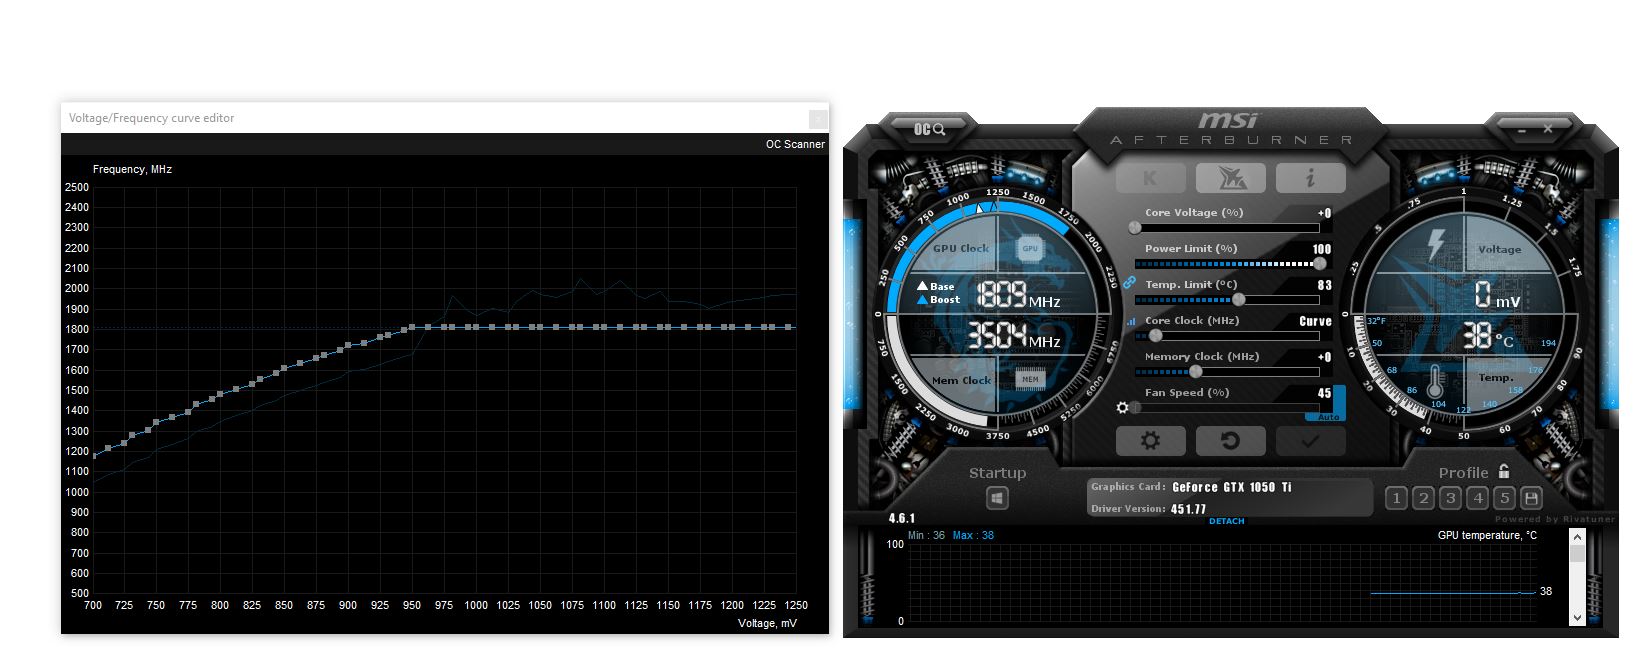
As you can see, after just starting Unigine Heaven, my GTX 1050 Ti boosted itself much more than the advertised Boost clock:
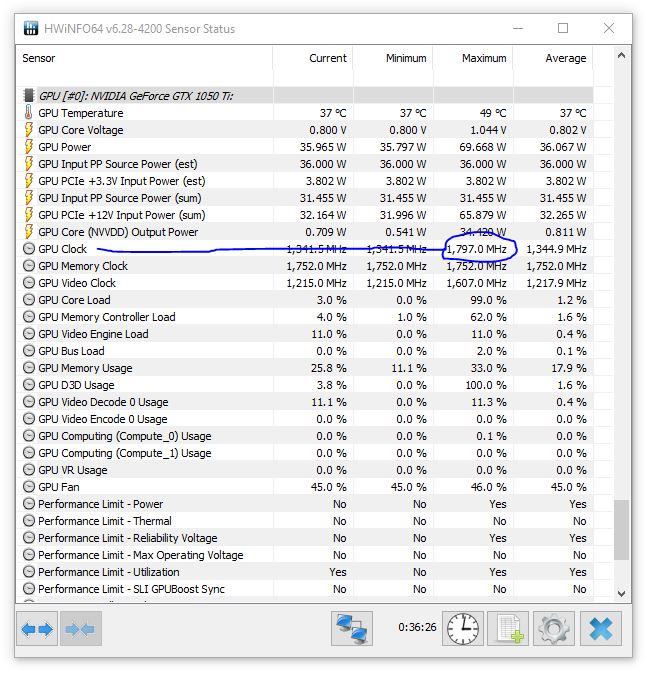
Now, the GTX 1050 Ti is definitely not a beast. It will probably sustain those clocks for a while without any major temperature issues. But a more powerful card might actually decrease them over time as it heats up. That’s what we’re trying to avoid.
MSI Afterburner
Finally! We’re doing some undervolting!
MSI Afterburner is a power tool, but it can seem unintuitive at first. No fear!
After opening Afterburner, press CTRL+F to bring up the voltage frequency curve. Let’s say we want to set the GPU voltage to a maximum of 950mV (as opposed to 1.050V in my case, if you check the screenshot above from HWiNFO).

So we just click on the square that is in front of 950 mV. But wait!
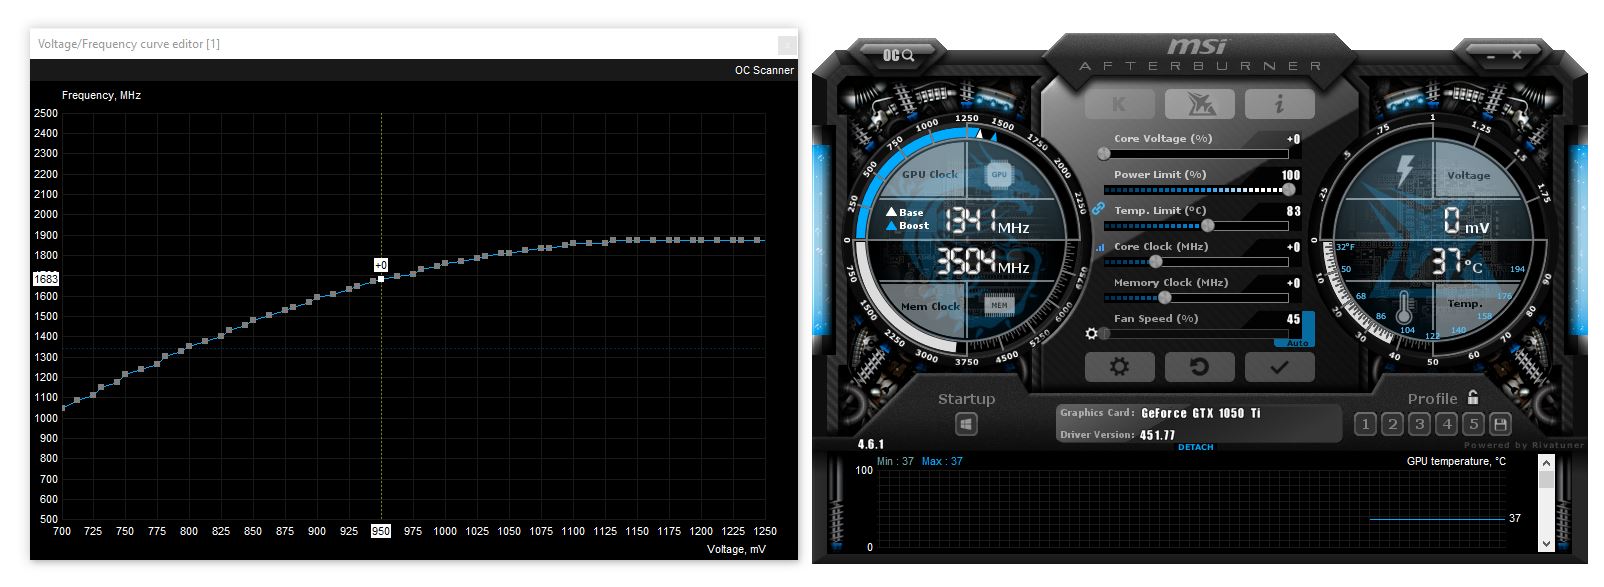
Afterburner shows us what frequency our GPU will be at, at that voltage. So it’s 1683 MHz. Way lower than my target of 1809 MHz as I’ve previously determined.
To solve this, we just need to go back to the main window of Afterburner, and increase the core clock until the number from 950 mV is as per our requirements. In my case, I need it to be 1809 MHz.
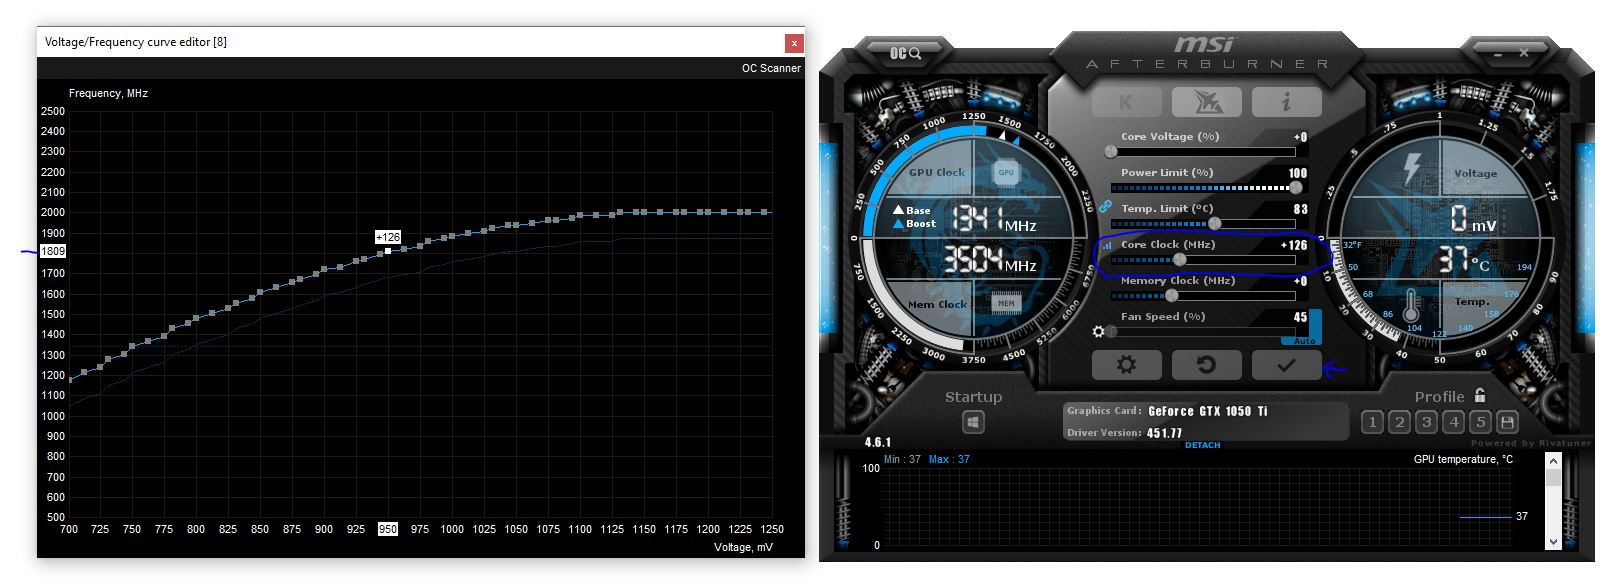
As you can see in the above image, I’ve increased the Core Clock until it matches my required frequency. And then just click apply. If the frequencies shift a little, re-adjust and apply again.
So now that we have our max boost frequency desired at 950 mV set, we need to do the following to ensure our GPU will NOT go over 950 mV and that stable frequency:
- Select the point at 950 mV
- Press L to lock that voltage
- For all voltage points greater than 950 mV (to the right of the locked point), drag them to or below your frequency (in my case, 1809 MHz).
- Hit apply in Afterburner’s main window and everything will be set to be the same frequency as our locked voltage.
- Press L to unlock the voltage. Forgetting to do this will lock your card at this voltage. Not what we want, as when we’re idle, our card will go lower than this.
And here’s a bunch of images of me doing the above 5 steps:


After hitting the last apply in the above steps, you’ve just undervolted your GPU. Congrats!
Now you need to benchmark and note the temperatures and other data as stated above.
And I cannot stress this enough: test! benchmark! game! Make sure your settings are stable.
After you’ve done at least 3 benchmarks in one program, 3 in another and have played a game for at least 1 hour in my opinion. This is to make sure your video card is stable. And before you ask, yes! You can actually make some 3D Mark Time Spy runs successfully without errors but actually fail or BSOD in another benchmark or game. It’s just how these things work. You need to make sure to stress the card in different types of workloads, to make sure it’s stable.
note: if you want to overclock while undervolting, you just need to adjust the Core clock higher. That’s basically it. And then increase the memory voltage too. Again, do it in small increments to make sure you’re not going overboard.
So these are my results:
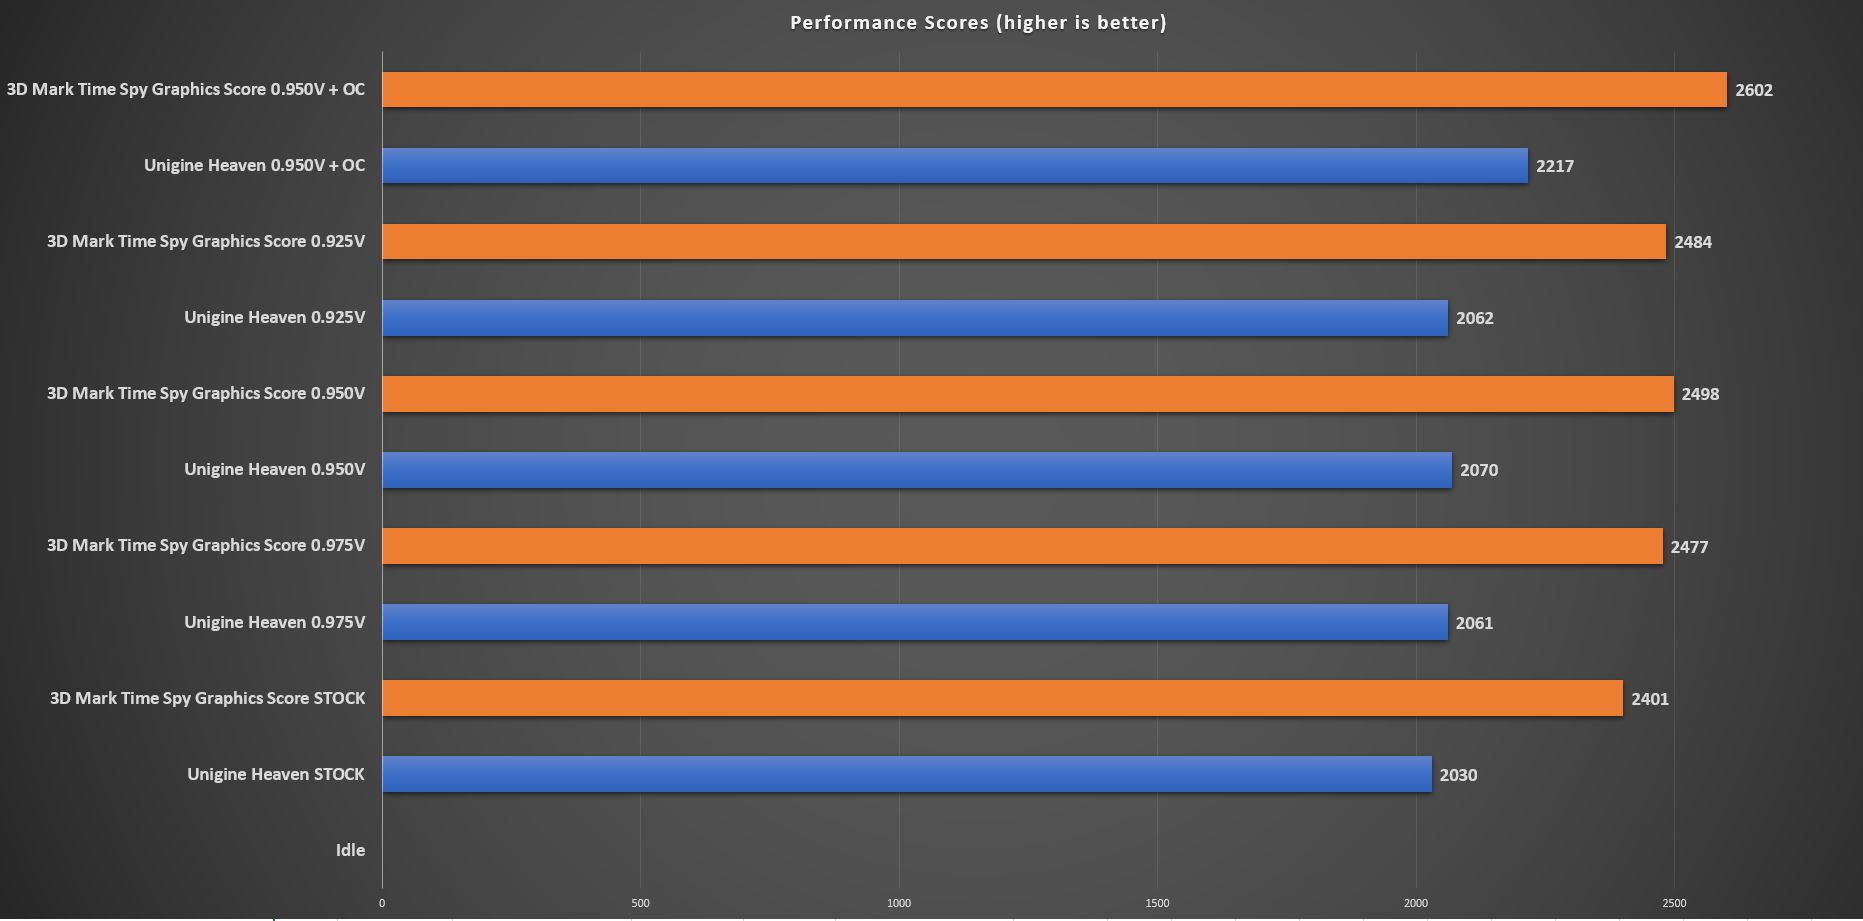
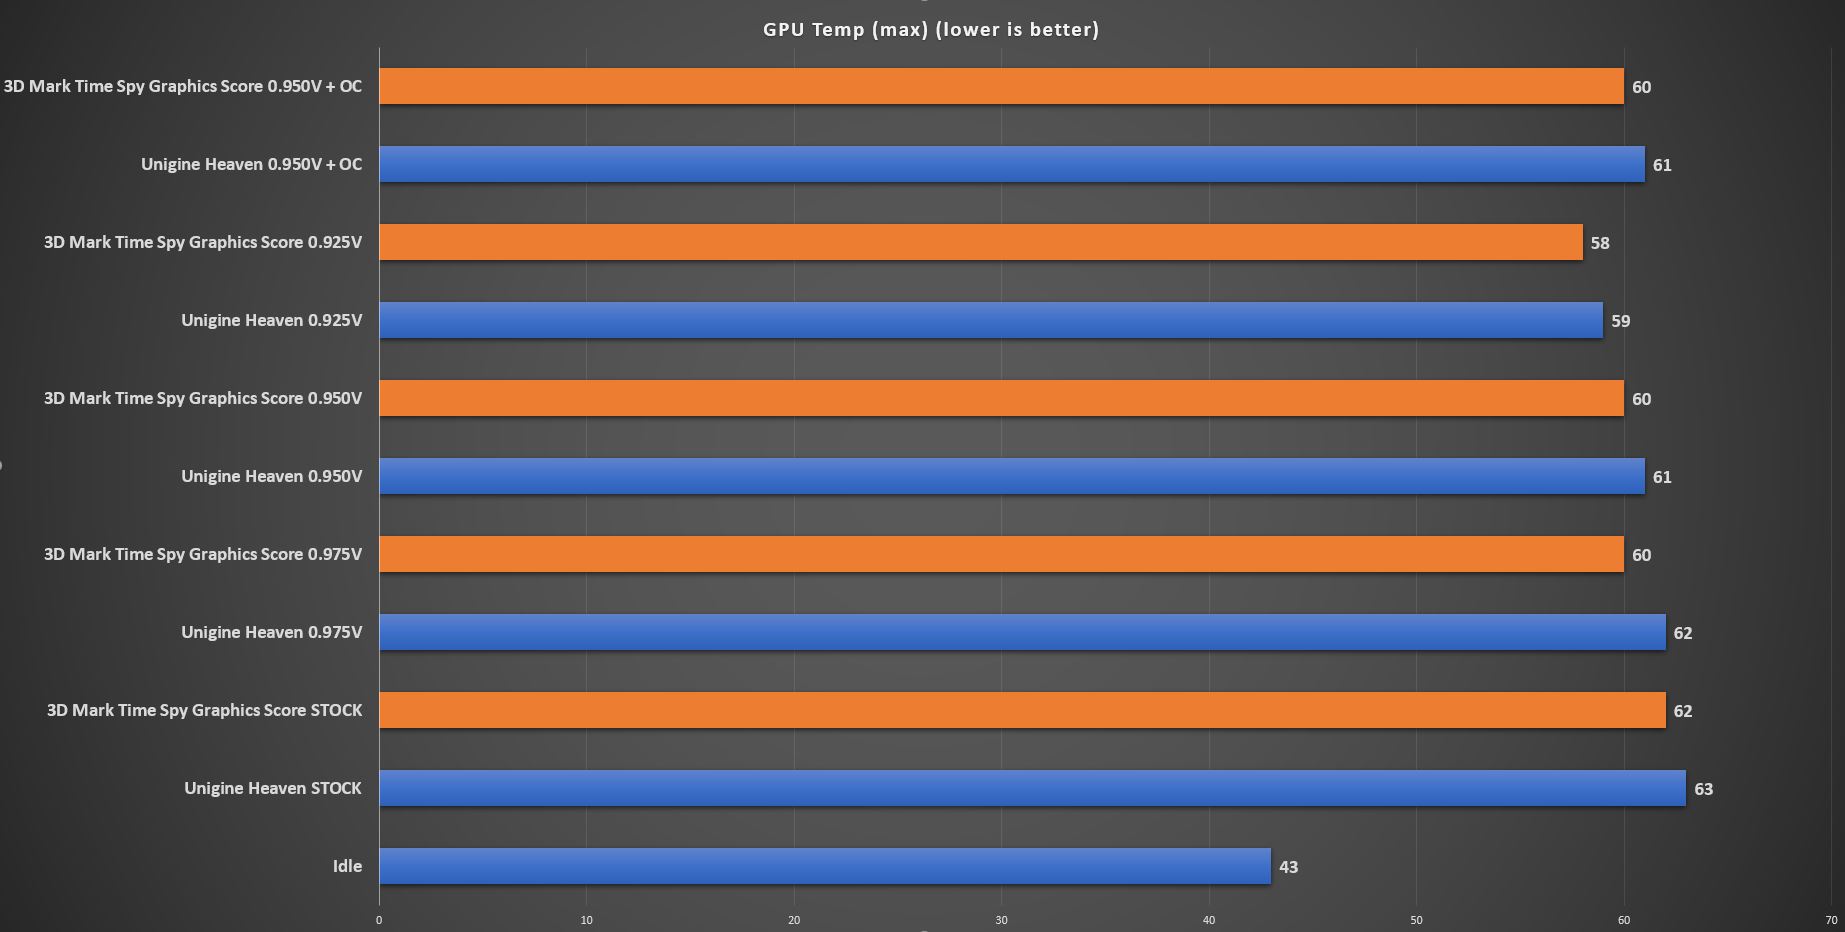
As you can see I’ve shaved a couple of degrees. And then I went ahead and overclocked and got a ~8% boost in all of my 6 runs of these two benchmarks. So I basically got the GTX 1050 Ti to run about 2 degrees cooler while performing 8% better. For free!
Conclusions
Si just by carefully monitoring with HWiNFO and using Afterburner we’ve went ahead and decreased the temperatures of a puny tiny GTX 1050 Ti with an average of 2-3 degrees. And then got an 8% performance boost!
I encourage you to try out undervolting your GPU and even try overclocking it a bit. You might be surprised of the results! And if you’re not into overclocking, you probably will appreciate a more efficient GPU.
Thanks for reading this far!
Don’t forget to share this article if you found it useful! Thank you!


1. Run a benchmark 3 times and make the average of the Graphics Score (sum up all the scores and divide by 3)
can help me to explain of divide my score?
Hey!
Sorry for the late response!
I was meaning something like this:
So if you run a benchmark 3 times and you get the scores: 3212, 3301 and 3254 you add them up and divide by three. To get the average scores between the runs.
So that means for the scores above we would get 9767. Divide it by three and you get ~3255. That would be the average score of our three runs.
Hope I helped!
Thanks man,i got a GTX 1050 TI mobile ,but it seems soo complicated to me to do all this.. stuff ,i wonder if there is a free app wich can ”magicaly” undervolt ur gpu just using a few clicks,, anyway.. Bye.
Hey! Thank you for your comment!
Just take it step by step. It just seems complicated the first time you do it.
And after that, basically you just save the profile and never have to do it again until you change your GPU 😀
Thanks for the info. I have a GTX 1660 Super Tuff GPU from ASUS and that sucker runs hot when doing Doom Eternal with fast sync on. But I want fast sync on because my monitor is only a 60Hz refresh monitor and I want to reduce the lag from the input.
I followed your tutorial which is awesome. One thing I noticed, you stated your max was 1809 and then you refer to your HWinfo window as well, but it shows a max of 1797, so that caused me some confusion at first but I get what you were trying to achieve.
I would say for those that are confused by it, read it over and over again BEFORE even attempting to do it. Make sure you understand what he is saying which he is explaining very well. I think just that HWInfo screen shot threw me for a loop at first because it didn’t say 1809. So just pretend that it says 1809. 🙂
For me, my temps before doing this were 89C, wattage usage of 110 and the core clock was topped at 1910. And the fan goes nuts with it. lol Very loud.
I finally got this so that I’m at 925mV and still getting the max of 1910. The temps are still around 88 C when doing Unigine Heaven benchmark, but my wattage went from 110 down to around 89, so I definitely reduce the wattage consumption which means it shouldn’t generate as much as heat I guess, even though the GPU temp didn’t really change much.
Performance/FPS-wise, I’m still get well over 120 FPS (with fast sync on) in Doom Eternal. Also, my Unigine Heaven benchmark score went from 1490 (stock) to 1600+ (udervolt at 925) after doing this.
So thanks again for this article. It helped!
Hey! I am glad the article was useful!
Yes, in HWinfo sometimes it really doesen’t go up to 1809 MHz. I think it depends on the type of workload the GPU has. But I couldn’t just remake-it again :)) I figured even if it’s wierd people will get it.
Thanks again for stopping by my blog! 🙂