


Let’s say you have a laptop, and you’re looking for upgrades on a budget. Getting a more responsive system and an overall performance increase from your laptop does not necessarily mean breaking the bank.
And yes, in most cases there are ways to upgrade a laptop. Sometimes, even if it’s just software-related stuff, you’ll get some extra life/performance from your old lapto. You can do a few things on the cheap to make your life better alongside your notebook for a while. Read on.
Each of the below points will also contain what you need to find out and where you can do it. Most of this stuff is easily DIY so you can save the money you’d spend on someone else doing the work.
Please keep in mind that this article has in mind users with laptops older than 2-3 years, and/or users with budget laptops that want more without buying a new system or a new laptop. If that’s you, great! I hope the following ideas will help.
Also, this is more of a Windows-focused article. We’ll tackle Linux and laptops soon in another article!
Upgrade to a brand new SSD
There are still a lot of laptops that come with Hard Disk Drives, in an age where SSD (Solid Disk Drives) are quite affordable. But manufacturers try to cut costs so… chances are you have a laptop with an HDD.
Going from the 1 TB HDD that came with your laptop to a 1 TB SSD will make a huge difference in almost everything you do. Before you ask, an SSD will note improve FPS in games. But everything else will load faster, start faster and work faster. + SSD’s are not as sensitive to shocks in case you hit/drop your laptop.
How to tell if your laptop has an HDD?
In Windows 10, open the Disk Defragmenter utility / Optimize Drives that comes with Windows. There, the utility will list all the drives in your system, as well as their type.
A quick way to do this is to simply press the Windows Key + R, type dfrgui in the window that appears, and press enter. Done!
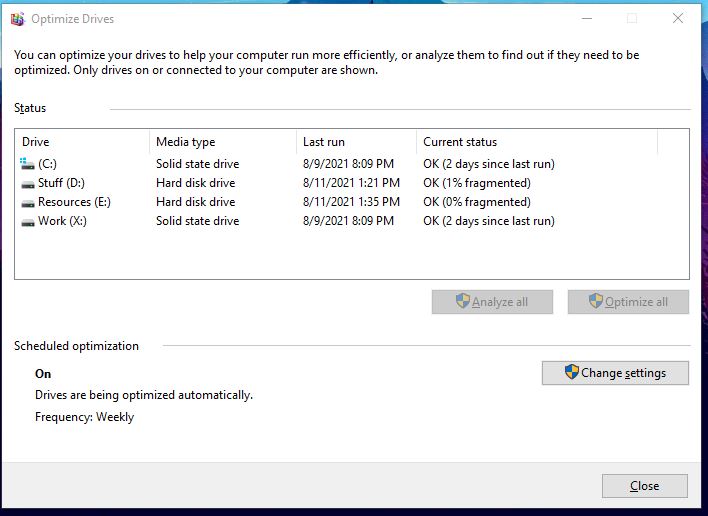
this window, on the media type column, tells us if that drive is an HDD or SSD
How much does it cost?
It depends. Usually, notebooks come with one slot/place for an HDD or SSD. So if you have a 1 TB HDD, upgrade to at least a 1 TB SSD. If your budget allows, go higher!
For the 1 TB example, I’ve seen SSDs from Team Group as low as 82$. To be fair, since this is your precious data, I’d choose a Samsung, Seagate, Kingston, ADATA, or Western Digital SSD. A 1 TB Samsung EVO SSD is listed for 120$ right now. That’s a very fast and trustworthy SSD that will probably outlast you.
Either way, you go, any modern new SSD you can find in stores will be blazing fast compared to a 3-year-old HDD. Heck, even compared to a brand new HDD, your SSD will be insanely fast. It’s not all marketing and hype, they really are fast! 🙂
How to physically replace the HDD?
In short, on most laptops, you remove the back cover (usually a couple of screws), carefully remove the HDD, and plug the SSD back in its place. Take note of the slots, they only go one way in – so you can’t get it wrong.
But this is 2021, and if you Google your notebook model + disassembly / teardown or even HDD replacement, there are many chances to find a YouTube video on this.
You will need a Phillips screwdriver and about 20 minutes or more, depending on your laptop model. I also made a guide about choosing an SSD based on its memory type here.
Things to keep in mind
There are a few things to keep in mind when doing this.
- Your new SSD comes blank. No Windows, no data, it is completely empty. You will most likely need to reinstall your OS on it, and your software etc.
- There are a couple of options for copying everything to your SSD, but I’d use this upgrade as an ocasion to start fresh if possible.
- You’ll most likely need some of your data from your old HDD. Make a plan, like coupling your old HDD to a desktop PC and transferring files to the laptop from there. Or get a SATA to USB adapter. This way you can plug the old HDD in one of your laptop’s USB ports – but it will be quite slow, thankfully you only have to do this once
- Bigger SSD’s are most of the times faster.
- SSD’s use less power than a HDD.
- SSD’s do not make any noise.
- SSD’s are not as sensible to shocks as HDDs.
- Sometimes paying extra is worth it. Sometimes not. Go for capacity and a good brand, try to buy at least a TLC SSD.
So apart from the huge speed gains, there are other advantages too, as stated in the list above.
Upgrading to an SSD can make a frustratingly slow laptop seem like new again, without spending the big bucks on a new laptop.

Add some RAM
A lot of laptops come with 4 GB or 8 GB RAM preinstalled. That’s fine. But chances are if you need to do something more demanding, you’ll need 16 GB. Or even more!
First of all, let me say this: when you run out of RAM, like running Chrome and Photoshop on a laptop equipped with 4 GB RAM, things will start to be sluggish. Basically, you won’t be able to multi-task as easily.
Heck, some programs might run slow on their own because of the amount of memory they need.
And yes, having a decent amount of RAM helps even if you’re just using your laptop as a multimedia and office system. Try loading 4 big spreadsheets, a Zoom meeting, and having some Chrome tabs on a 4 GB RAM system. I’m not saying it’s not going to work, but it won’t be fast.

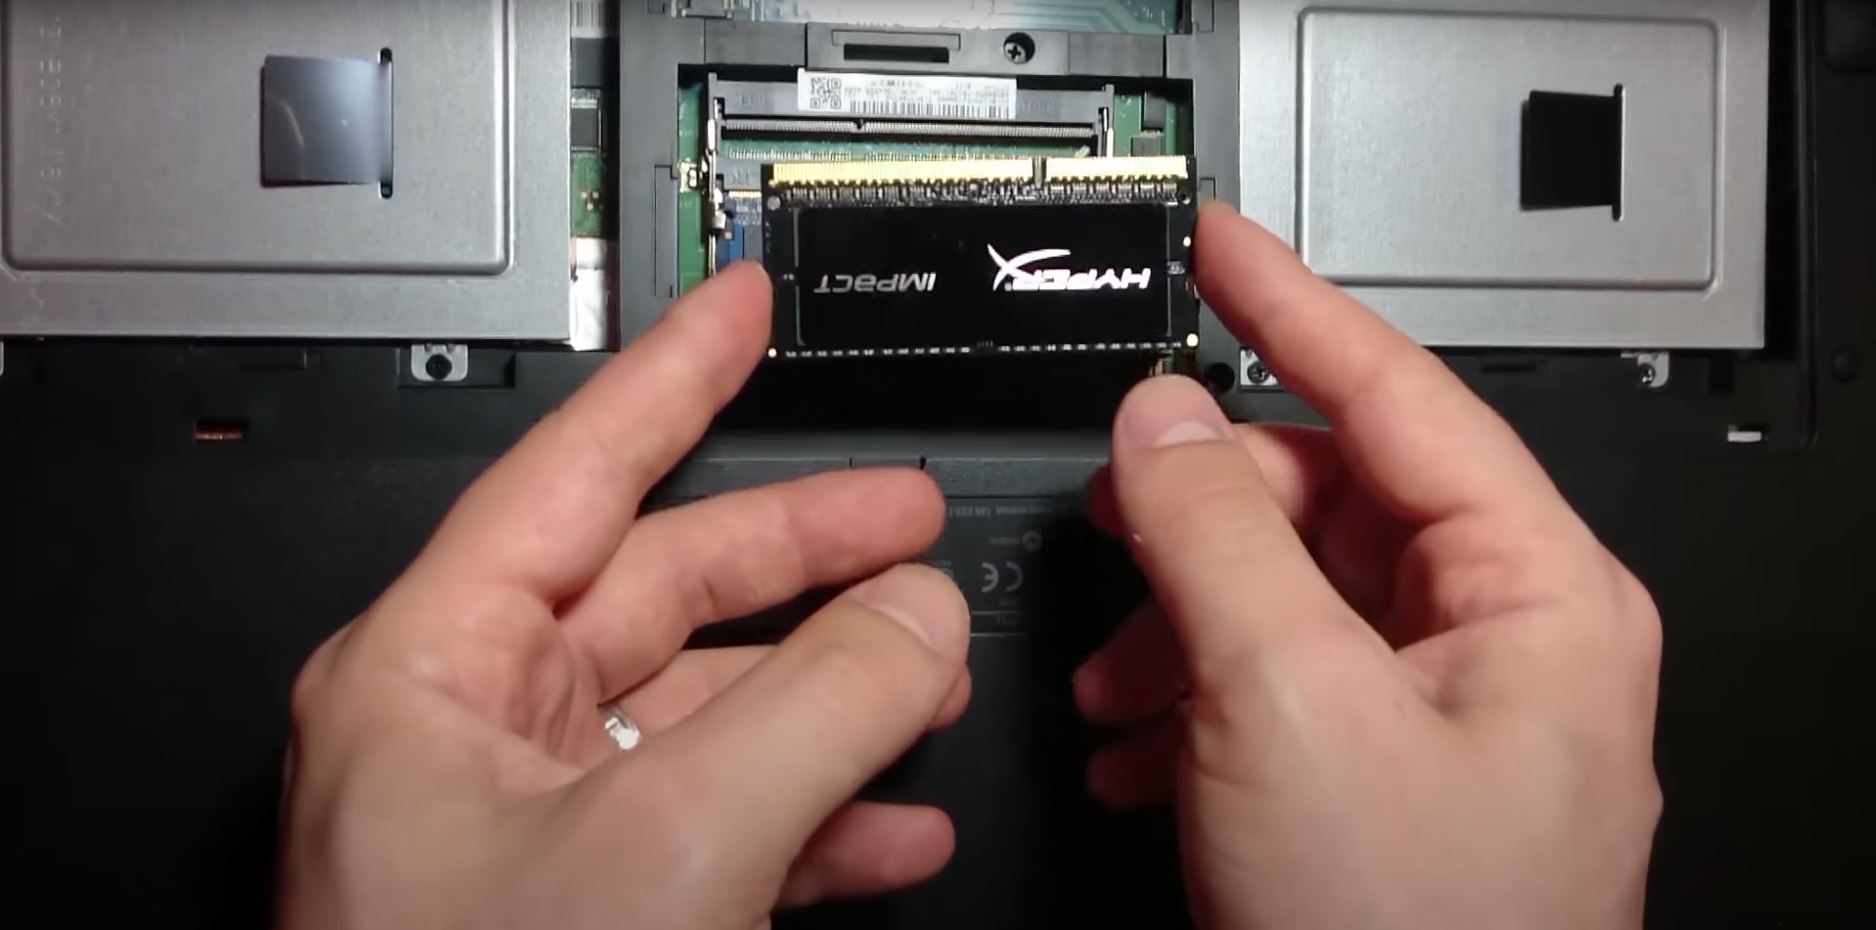
Adding another RAM stick into my laptop
But please keep in mind that no amount of RAM can make up for a weak CPU or GPU. While upgrading the amount of RAM in your system might improve a lot of things and even gaming, if your CPU/GPU can’t handle the game it won’t do much. (what I mean to say is that if your game requires at least 8 GB of RAM and you have 4, an upgrade will help. But depending on your CPU and GPU, that might be enough to make the game run smoothly or just a little bit better)
How to find out what type of RAM you need
First of all, most laptops use something like SO-DIMM slots and modules. This means that they are smaller than desktop PC RAM and that you cannot put laptop RAM into a desktop PC and vice-versa. (of course, there are exceptions)
This is easy, you just need one piece of free software – CPU-Z and to know what to look for. You can get CPU-Z by clicking here. Just download the zip portable version, by clicking the ZIP ENGLISH pink button and then download now. Extract the archive contents to a folder and run the program.
Following the below list will make sure that your new RAM stick will work with your laptop. Of course, where possible aim to follow your laptop’s manufacturer recommended list – the modules listed by your laptop’s manufacturer mean that they tested them and it works. It doesn’t mean that other RAM modules don’t work with that model. (some brands have listed the compatible memory with their products on the product support page)
What we need to find and where you can see it after opening CPU-Z:
- RAM size is found in the Memory tab, in the Size section (ex: 32 Gbytes)
- RAM Memory Type is found in the Memory tab, in the Type section (ex: DDR4)
- RAM Memory Speed – we care at what frequency our RAM is working. Find this in the Memory tab, at the DRAM frequency section. Round up that value. For example, 1600 MHz ram, can run at 1596 MHz and it’s ok. DDR meaning double data rate, we need to multiply this value by 2. That means that our 1600 MHz ram is actually 3200 MHz ram, and that’s how we’ll find it in stores when wanting to buy more.
- RAM voltage – go to SPD tab, and look at the Timings Table. Check the voltage in the rightmost column. (ex: 1.350v, or 1.35v as you’ll see it in stores)
- RAM main timings – at the SPD tab, still the rightmost column in the Timings Table, the most important latency and often found in the product name in an online shop is the CAS# Latency. (ex: 16)
- Optional: manufacturer can be found in the SPD tab, at the Module Manuf. section (ex: Corsair)
All of the above specifications can be seen in the below images:
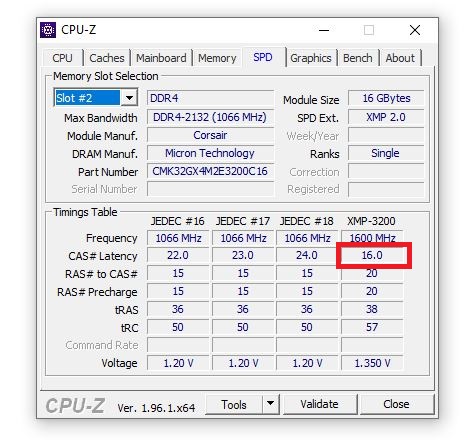
CAS# Latency 
RAM Manufacturer 
RAM Size 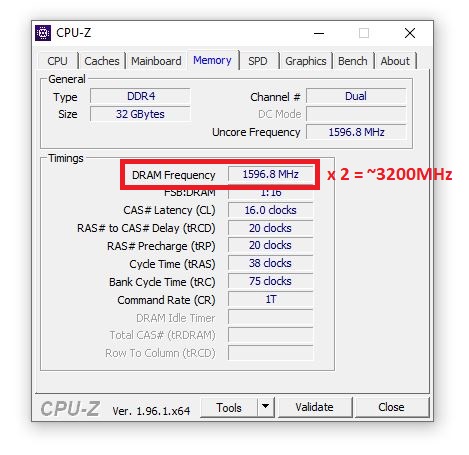
RAM Speed 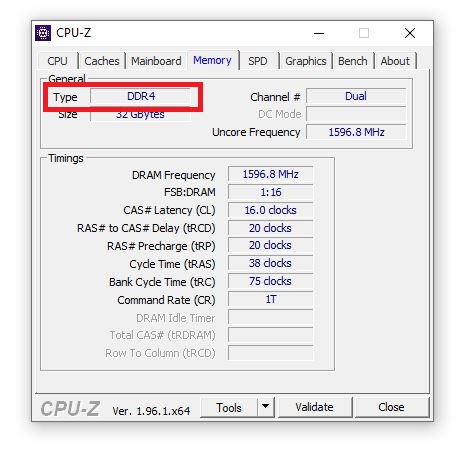
Ram Type 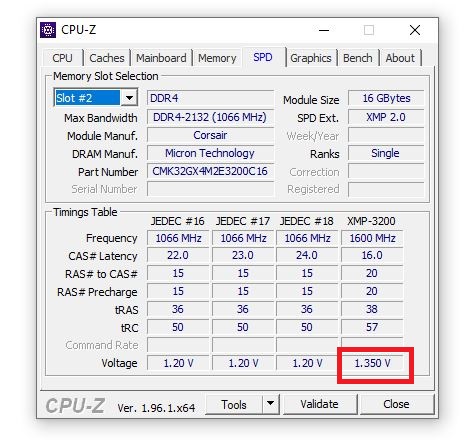
Ram Voltage
How to find out if your system supports more RAM and what to do
This can turn out to be a bit tricky for some laptop models, as specifications might be unclear.
Find the manufacturer’s website and check for specifications like maximum supported memory and the number of RAM slots.
You’ll most likely end up in one of these situations:
- You have two RAM slots, and one of them is empty; You lucky bastard! Just use the above steps to find what type of memory you need to buy and you’re all set.
- You have two RAM slots but both are filled (let’s say you have 2 x 4 GB RAM modules). If you want to go to 16 GB RAM, you’ll have to replace your modules with 2 x 8 GB RAM sticks. Not that great, since you will have some leftover parts, but maybe you can sell them to recover part of your investment;
- You have one or two empty slots, and RAM soldered to the motherboard. I’ve seen this in a couple of laptops. Not that great, but you can actually upgrade these too.
- Other unique situations, like high end laptops with 4 RAM slots and etc.
How to actually install the RAM in your laptop
The easiness of this operation depends a lot on the model you have. For example, in my Asus G551VW, I just have to remove 4 back screws and I have access to the RAM slots.
Make sure to do a YouTube or Google search on your specific model. Something like: ‘your-laptop-model ram upgrade’. Tip: Find the exact laptop model on the back label, on its box, or on the original invoice.
Some laptops make you remove the keyboard and other parts in order to get to the RAM.
If you cannot find a video guide on this, and you are feeling unsure, it’s best you take your notebook to a shop that can do this for you. And it’s usually not that expensive either.
Example and how much can it cost
I’ll take one of my laptops as an example. It’s an Asus G771JW-T7022D that came with 1 stick of Samsung 8 GB DDR3L at 1.35v. Figured this much from the product data-sheet.
Now with CPU-Z, I found out that it runs at 1600 MHz and that the CAS# latency is 11. So we’re looking for another 8 GB DDR3L SO-DIMM ram stick, that runs at 1.35v and has a latency of CL 11.
At today’s prices, such a module costs about 30$ on Amazon. That’s pretty good! For 30$ I can double my RAM from 8 GB to 16 GB. Neat!
Undervolt if you can
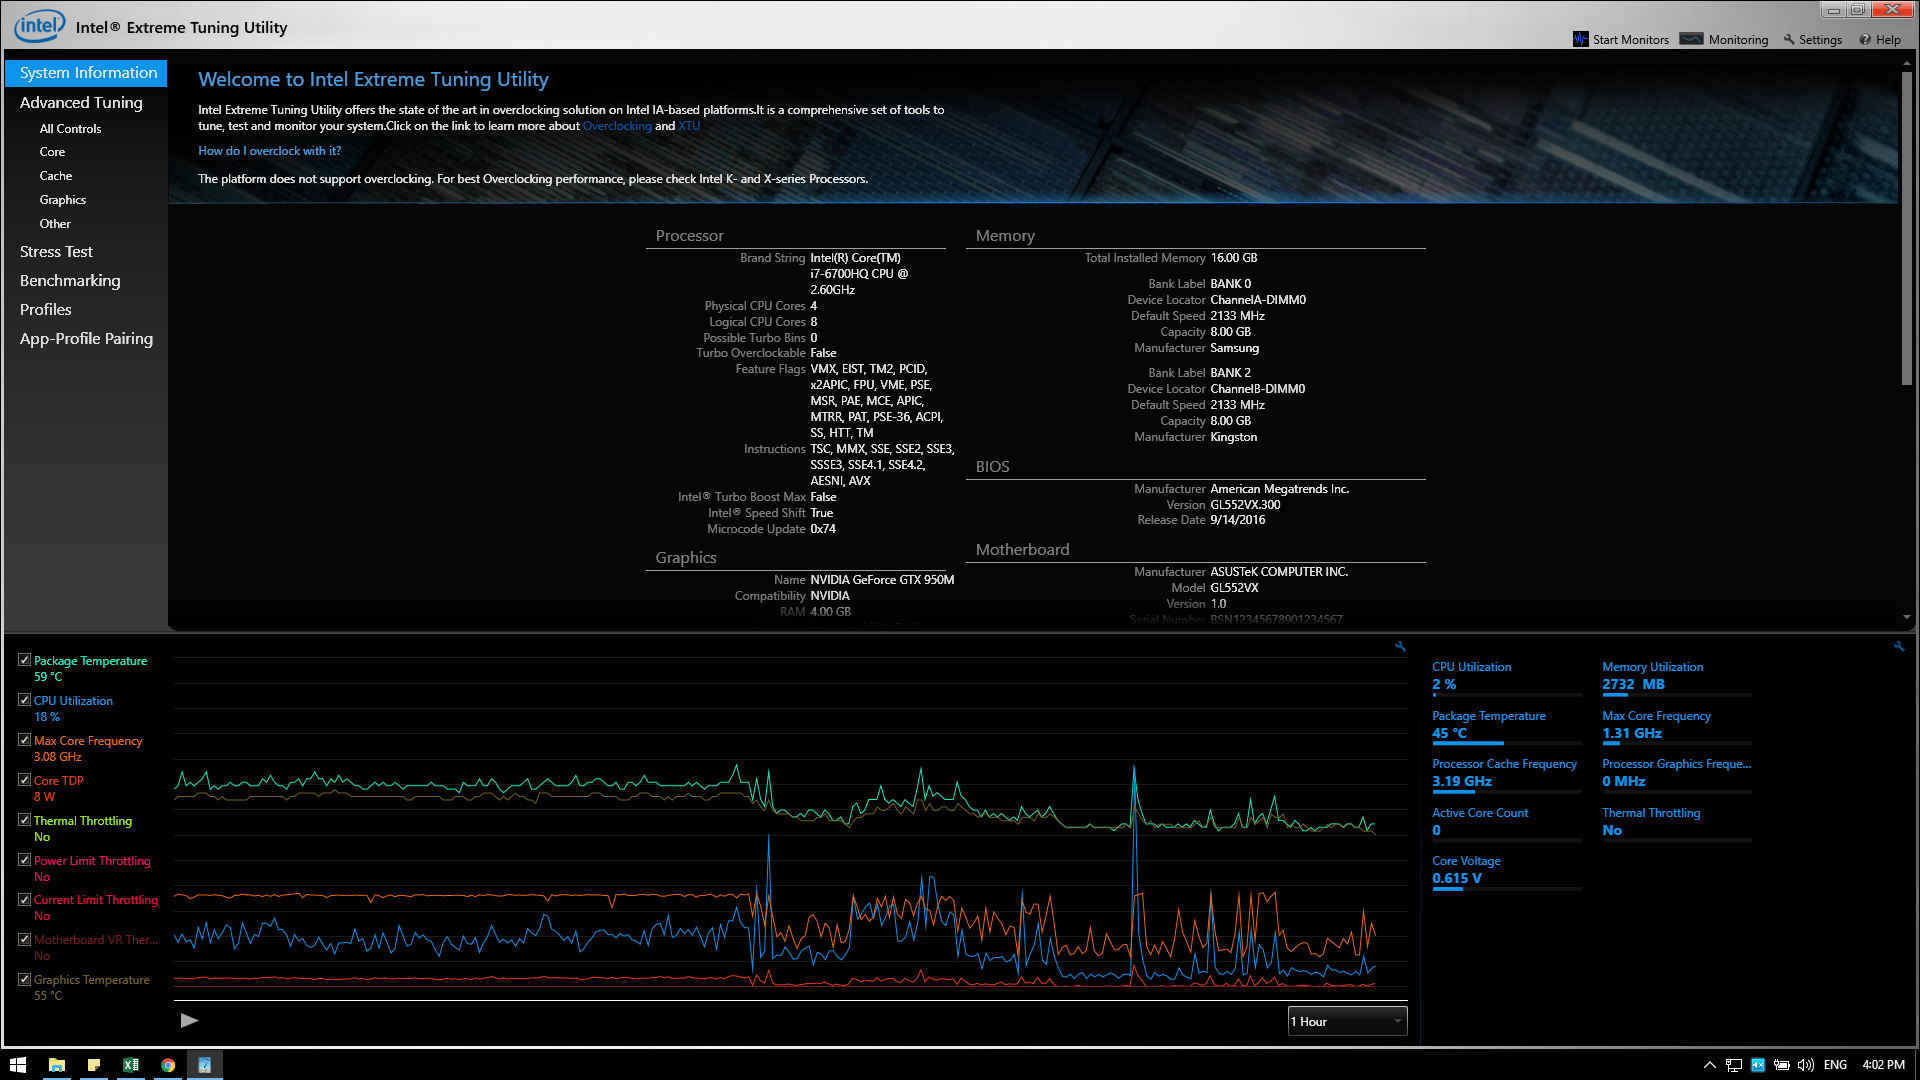
On Intel laptops, you can usually undervolt using Intel XTU or Throttle Stop. It’s dead easy, and after a few hours of tinkering, you can find stable settings that work for your CPU.
For example, my Asus GL552VW, which comes with an Intel Core i7-6700HQ has been able to go as low as -0.130v core offset in Intel XTU. That gave me about 10 degrees Celsius in temperature reduction while running a stress test in OCCT for 1 hour, and about 8 degrees Celsius while processing a 10-minute video in Adobe Premiere CC.
And all that for free! I also made a short video guide here on undervolting.
So by all means, try and see if you can undervolt your laptop. In a lot of cases, you don’t just reduce temperature, but also gain performance because of a process/phenomenon known as thermal throttling.
And if your laptop has a dedicated graphics card (GPU) like an Nvidia GTX 1050 Ti or something like that you can try undervolting that too! For lower temperatures and extra performance.
Get a cooling pad
A cooling pad can help even if you’re using your laptop on a desk. But it’s almost mandatory to use one (if you care about your laptop) if you’re placing your laptop on the bed or on a blanket/other textiles.
Why does a cooling pad work?
It gives the bottom of the laptop some room to breathe, as most laptops have their intake on the back, that faces the desk.
As laptop cases are already quite restrictive as they are small, any bit of extra help on cooling helps.
How to tell which model I need?
Inspect your laptop!
You should find some grills or holes on the underside of your laptop. That’s usually one of the spots your laptop uses to get fresh air to cool its components.
After finding the intake (the place your laptop tries to pull air to cool itself), you now need a cooling pad that can feed air directly in that spot. Not that other models won’t work, but we want to be as efficient as we can.
I have to say, that one of my favorite laptop cooling pads is the Cooler Master Notepal U2 PLUS V2. As well as its older variants (which I have). You can move the coolers around almost anywhere for optimal cooling, and they are quite durable and lightweight. It’s a bit on the expensive side, as it’s almost 40$ on Amazon at the time of writing this article. But it’s worth it in my opinion.

Of course, there are some amazing options in the 20$ to 30$ as well. Just shop around.
There might be better options, with higher airflow than what I have. Just find the one that fits your needs the best and doesn’t break your set budget.
Clean your laptop and change the thermal compound
So this is the tricky part.
If your laptop is older than 5 years, it’s almost a guarantee that replacing the thermal compound with a new one, preferably something high-end such as Noctua NT-H1 or Thermal Grizzly Kryonaut, will give you lower temperatures and a better working laptop.
While you’re there clean the whole cooling system – blow the dust out of the fan and radiator fins.
Again, as there are thousands of laptop models, it’s best that you try and search for a video guide on how to do this operation if you’re not that much of a DIY-er or a techie.
The safest route is to take it to a shop.
On both my laptops I changed the thermal paste with a Noctua NT-H1 and the results were quite impressive, as both laptops have dedicated GPUs too, that share the heat pipes with the CPU. It took me about 1h per laptop. It’s really not that hard if you do it once, especially following a video guide or a tear-down type of video.

And as a 3.5g of Noctua NT-H1 is ~8$ and lasts for at least 4 applications (one tube was enough for my two laptops and two desktop PCs and I had some leftover) it’s not that expensive if you decide to do DIY this operation.
Warning! Replacing your thermal compound might void your warranty! Check with the manufacturer!
The ghetto way
Of course, if you can’t be bothered to do this, or you don’t have a computer shop that will help nearby… there is a ghetto way to clean your laptop a bit. Just blow the exhaust (the part from where hot air comes out of your laptop) with a can of compressed air. About 3-5 short bursts should take some dust out of the system.

This method is not quite ok, as you probably won’t be able to block the fan from spinning, and spinning a fan while not powered on is not recommended. But it’s a quick bandaid that I’ve seen to work on old laptops, as some consistent amount of dust went out. Temperatures did saw a little bit of drop, but nothing spectacular. I’d call it a … decent emergency and temporary fix.
Conclusion
So with a bit of time and a moderate budget, you can bring your old laptop to 2021 and make it work a lot better.
If we take a 5-year-old laptop with a decent i3 or i5 Intel CPU (for the sake of the example), 1 TB HDD, and 8 GB of RAM and do this to it:
- replace HDD with 1 TB SSD for ~100$
- add 8 GB of RAM for ~35$
- add a cooler pad for ~35$
- change thermal compound for ~8$ if you DIY
- undervolt it for 0$
- a couple of bursts on the exhaust with a compressed air can ~5$
For just about 183$ I promise you you will have a better computing experience. Doubling the RAM will help with almost any application and that SSD will make everything feel snappy like you were running on a totally different laptop!
All this while getting lower temperatures, a longer-lasting laptop, and probably some extra performance due to reduced thermal-throttling!
If you don’t have issues like needing a dedicated GPU or a much powerful CPU/GPU combo for a game or a specific professional application, this 178$ upgrade will make a better investment than a new laptop. (a decent one with a 15.6-inch screen, 16 GB RAM, and 1 TB SSD is well over 500$)
The bottom line is this: if you don’t have a lot of cash ready for a substantial upgrade, for a new-gen laptop, it’s almost always smarter to upgrade your laptop with at least an SSD and some extra RAM.
You’ll get a better deal in terms of performance per dollar.
Of course, if your laptop is damaged, a new one might be the only way out. But most of the time, that is not the case. A decent i5-6440HQ, when coupled with a modern SSD and some extra RAM can be a great work machine, and even a decent gaming machine if you have a dedicated GPU.
If this article helped, share it so others can find out about these ideas! Thanks!


